As the days grow longer and nature begins to bloom, spring offers the perfect opportunity for a fresh start—not just for our homes, but for our minds. Just as we clear out cluttered closets and dust off neglected corners, it’s just as important to spring clean your brain, sweeping away mental fog, distractions, and thought patterns that no longer serve you. After the initial energy of New Year’s resolutions fades, this is your chance to pause, reset, and create space for more clarity, focus, and ease.
Enter: the 7-Day Mental Clarity Reset—a guided, weeklong commitment to decluttering your thoughts, habits, and daily inputs. Over the next seven days, you’ll refine your rituals, filter out unnecessary mental noise, and prioritize what truly moves you forward. This isn’t about an overwhelming overhaul but rather small, intentional shifts—editing your digital space, reshaping your routines, and redefining what (and who) you give your energy to. Each day is designed to bring you closer to a sense of lightness and purpose, aligning your actions with the vision you hold for yourself.
Featured image from our interview with Mari Llewellyn by Michelle Nash.
Spring Clean Your Brain: A 7-Day Reset for Mental Clarity
Throughout this reset, you’ll find a blend of mindful action steps, intentional reflection, and journaling prompts to help you process the shifts you’re making. The goal? To emerge from the week with a clearer mind, a deeper sense of presence, and habits that support—not distract from—the life you’re building. Consider this your invitation to step away from the noise and into a space of clarity, ease, and intention. Let’s begin.
Day 1: Clear Your Physical & Digital Space
When our surroundings feel chaotic, our minds follow suit. By simplifying your space—both physical and digital—you create room for clarity, focus, and ease.
Action Steps
Tidy one space. Choose a daily-use area (desk, nightstand, or kitchen counter) and declutter for 10 minutes. Remove what doesn’t belong, wipe down surfaces, and create a sense of order.
Do a 5-minute phone detox. Delete unused apps, organize your home screen, and clear notifications that have been piling up.
Set phone boundaries. Turn off non-essential notifications, create app limits, and designate phone-free zones (like your bedroom or dining table).
Journal Prompt
How does my environment influence my thoughts and energy? Write about how physical and digital clutter impacts your mood, focus, and sense of calm. What small shifts can you make to create a space that feels more supportive?
By the end of today, you should feel a little lighter—mentally and physically. This is your foundation for the clarity ahead.
Day 2: Brain Dump & Mental Decluttering
When your mind is filled with to-dos, worries, and unfinished ideas, it’s hard to focus on what matters. Putting these thoughts onto paper makes room for intentional action.
Action Steps
Do a 10-minute brain dump. Write everything on your mind—tasks, worries, ideas—without filtering. Get it all out.
Organize your thoughts. Highlight what’s in your control and what you can consciously release.
Choose three priorities for the week. Select three things that will have the greatest impact on your well-being, productivity, or peace of mind.
Journal Prompt
What’s one thought, worry, or belief I can release today? Reflect on something that has been taking up unnecessary space in your mind and imagine setting it down. What would it feel like to let it go?
By clearing mental clutter, you’re making space for what truly deserves your energy.
Day 3: Refresh Your Morning & Evening Rituals
The way you begin and end your day shapes everything in between. A mindful morning sets the tone for clarity and purpose, while an intentional evening routine helps you unwind and reset. Small, consistent habits can create a sense of stability and calm, allowing you to move through your days with more ease.
Action Steps
Choose one intentional morning habit. Pick a simple, supportive ritual—journaling, stretching, or drinking a full glass of water before coffee.
Create a gentle wind-down routine. Try going screen-free for 30 minutes before bed, practicing gratitude journaling, or reading something light and inspiring.
Journal Prompt
What small shift could make my mornings/evenings feel more grounding? Consider a habit that feels nourishing rather than like another task. How could this one change impact the flow of your day?
By bookending your days with intention, you create moments of clarity that ripple into everything you do.
Day 4: Mindful Consumption (News, Social Media, Content)
The information you take in shapes your thoughts, emotions, and mental state. Without intention, it’s easy to absorb negativity, comparison, or stress. By curating what you consume, you can create a digital environment that supports clarity and inspiration.
Action Steps
Do a content audit. Throughout the day, take note of how different types of content make you feel. Awareness is the first step to making a change.
Mute or unfollow accounts that don’t serve you. If a person, brand, or news outlet consistently adds stress or comparison to your life, give yourself permission to step away.
Set a “screen-free hour.” Designate time to disconnect from screens and engage in something restorative (reading, walking, etc.).
Journal Prompt
What type of content makes me feel inspired vs. overwhelmed? How can I adjust my digital habits to support more peace and clarity?
By becoming intentional with your consumption, you free up mental space for what truly nourishes you.
Day 5: Move Your Body, Shift Your Mind
Physical movement helps us process emotions, reduce stress, and create mental clarity. When you move, you signal to your nervous system that it’s safe to release tension, shifting stagnant energy and clearing mental fog.
Action Steps
Choose a movement practice that feels good today. This isn’t about intensity—it’s about intuition. Whether it’s a walk, gentle stretching, or dancing in your kitchen, pick something that supports your body and mind.
Build a breathwork practice. Breathwork, like deep belly breathing or box breathing, can create an instant sense of calm.
Notice how movement shifts your mindset. Observe how you feel before and after moving.
Journal Prompt
How do I feel before vs. after moving my body? What emotions or thoughts did I notice shifting?
By making movement a daily ritual, you invite clarity, energy, and ease in both body and mind.
Day 6: Reconnect With Joy & Creativity
Engaging in something purely for pleasure—without the pressure of productivity—helps clear mental space and boost your mood. Creativity doesn’t have to be an accomplishment; it’s simply a way to reconnect with your inner spark.
Action Steps
Do something purely for joy. Choose an activity—drawing, baking, or gardening—that isn’t goal-oriented. Let go of any pressure to be productive or perfect.
Make a “happy list.” List activities or places that make you feel inspired and energized. Let it serve as a reminder of what brings you joy.
Journal Prompt
When was the last time I felt fully present and joyful? How can I welcome more of that into my life, even in small moments?
By reclaiming time for creative, joyful pursuits, you open up space for mental clarity and emotional ease, helping you feel more aligned with your purpose and peace.
Day 7: Set Intentions for a Clearer, Lighter Life
Mental clarity isn’t a one-time reset—it’s a practice of ongoing intention. It’s about regularly returning to the habits, rituals, and mindset shifts that help you feel grounded and present. Today is about reinforcing the progress you’ve made and setting intentions to carry that clarity forward into your daily life.
Action Steps
Reflect on the past week. Take a moment to review your journey. What changes felt most impactful? Which habits supported your clarity?
Choose one clarity-boosting habit to continue beyond this reset. Whether it’s your morning ritual, movement practice, or digital detox, select one habit that supports your mental clarity and commit to making it a regular part of your routine.
Write a “mental clarity mantra.” Create an affirmation to repeat when life feels overwhelming or cluttered. This mantra will help center you and remind you of the calm, focused energy you’ve cultivated throughout the week.
Journal Prompt
What does mental clarity feel like for me? How can I cultivate it daily, even on the busiest days?
As you continue this journey, these small shifts will become lasting habits—an intentional foundation for a life that feels lighter, clearer, and more aligned.
Grits is simply dried corn that has been ground into a fine porridge. It’s not too dissimilar to polenta. When I think of grits I think of southern comfort cooking. But you don’t have to be from the south to enjoy this easy, delicious food. Grits can be made savory and sweet and served at breakfast, lunch or dinner. It’s a super versatile food.
Sometimes folks are intimidated about making grits assuming there’s a right way and a wrong way but this really isn’t true. Like most foods, there are more or less traditional ways to make and serve it but in the end it comes down more to your own taste and preferences. In this post I will show you how to make basic, delicious grits you can then customize all sorts of ways.
Related: If you like grits for dinner next up learn how to make risotto—another creamy, tasty grain that can be served with all sorts of meals.
Ingredients
Grits
Water
Chicken bouillon
Butter
Salt
Black pepper
I usually stir some cream (half and half) and shredded or grated cheese into my grits as well. But it depends what I am serving alongside it. I use water and chicken bouillon when making savory grits (which is most of the time).
How to Make Grits
Bring the water to a boil. Add the chicken bouillon cube and stir to dissolve.
While whisking, stir in the grits and continue to cook on medium/high heat for 12-14 minutes. Stir occasionally so the grits do not stick to the bottom of the pan.
Remove from heat and stir in the butter, salt and pepper. Grits are done when they have a smooth and creamy texture and the grains feel softened, not gritty. If adding cream and cheese add this now so everything can melt together and get warm.
Tips and Notes
Grits are made with a 4:1 ratio of water (or stock) to grits. In the recipe card here I’ve listed 2 cups of water to 1/2 cup of grits (in order to make two servings). You can cut this in half, double it, etc. Just use the 4:1 ratio as your guide.
Grits are usually labeled as simply grits, stone-ground or old fashioned. If the package says ‘instant’ this means the grits have been pre-cooked and the preparation is different (only need to add boiling water).
You can substitute the water and chicken bouillon cube for chicken stock or broth. You can also use other types of stock (beef, seafood, etc.) depending how you want to flavor your grits and what you are serving them with.
If you want to make the grits richer, add more butter, cream or cheese. If you want the grits to be thinner add more liquid when cooking.
If I am wanting to make sweet grits I skip the bouillon cube and black pepper and will usually add a little brown sugar and cinnamon to flavor and sweeten the grits. Cream and butter are still great additions, or you can add a little bit of cream cheese. 🙂
What to Serve with Grits
Get our FREE recipe guide with our most popular recipes of all time!
Get the Guide
Free Popular Recipe Guide
Our top 25 recipes of all time!
Print
Get the Recipe
Soft, savory and creamy stone-ground grits made with just a few ingredients.
Yield 2
Prep 3 minutesmins
Cook 12 minutesmins
Total 15 minutesmins
Instructions
Bring the water to a boil.
Add the chicken bouillon cube and stir to dissolve.
While whisking, stir in the grits and continue to cook on medium/high heat for 12-14 minutes. Stir occasionally so the grits do not stick to the bottom of the pan.
Remove from heat and stir in the butter, salt and pepper. Grits are done when they have a smooth and creamy texture and the grains feel softened, not gritty.
If adding cream and cheese add this now so everything can melt together and get warm.
Notes
Grits are made with a 4:1 ratio of water (or stock) to grits. In the recipe card here I’ve listed 2 cups of water to 1/2 cup of grits (in order to make two servings). You can cut this in half, double it, etc. Just use the 4:1 ratio as your guide.
Grits are usually labeled as simply grits, stone-ground or old fashioned. If the package says ‘instant’ this means the grits have been pre-cooked and the preparation is different (only need to add boiling water).
You can substitute the water and chicken bouillon cube for chicken stock or broth. You can also use other types of stock (beef, seafood, etc.) depending how you want to flavor your grits and what you are serving them with.
If you want to make the grits richer, add more butter, cream or cheese. If you want the grits to be thinner add more liquid when cooking.
If I am wanting to make sweet grits I skip the bouillon cube and black pepper and will usually add a little brown sugar and cinnamon to flavor and sweeten the grits. Cream and butter are still great additions, or you can add a little bit of cream cheese.
Nutrition
Nutrition Facts
How to make Grits
Amount per Serving
% Daily Value*
* Percent Daily Values are based on a 2000 calorie diet.
Notice: Nutrition is auto-calculated, using Spoonacular, for your convenience. Where relevant, we recommend using your own nutrition calculations.
Recently, a good friend called me in a near-panic: “I’m having eight friends over tomorrow night—what in the world should I make for that many people?” I’ve been there, and it can be tough to think of dinner party menu ideas that are elevated and elegant for your evening crowd. Especially if you don’t want to spend all day in the kitchen and/or lose your mind in the process.
But thanks to the fact that I started my career in catering (combined with the countless dinner parties I’ve thrown over the years), I’ve assembled quite a collection of dinner party menu ideas to feed a crowd that check all my required boxes. All of these dinner party recipes are:
Crowd-pleasing dishes that almost everyone loves.
Leverage large-batch cooking, like a sheet pan or grill, so that I’m not laboriously sautéing 16 individual fish fillets or frying 12 eggs to top salads.
And most importantly, I can do almost all the prep in advance so that by the time my guests arrive, I can join the party with them.
I divided this post into recipes that I make for dinners with 4-6 guests (due to the cooking techniques, or the fact that they incorporate pricier ingredients), and the recipes that are really easy to double or triple to feed a true crowd. These leverage larger cuts of meat, build-your-own components that let guests adapt to their dietary needs, and less expensive ingredients so your party budget doesn’t get out of control.
The next time you find yourself hosting an evening get-together and wondering what to make, bookmark this post for easy dinner party menu ideas. Trust me: all these recipes will leave your dinner guests happy, satisfied, and waiting for when their next invite arrives in the mail.
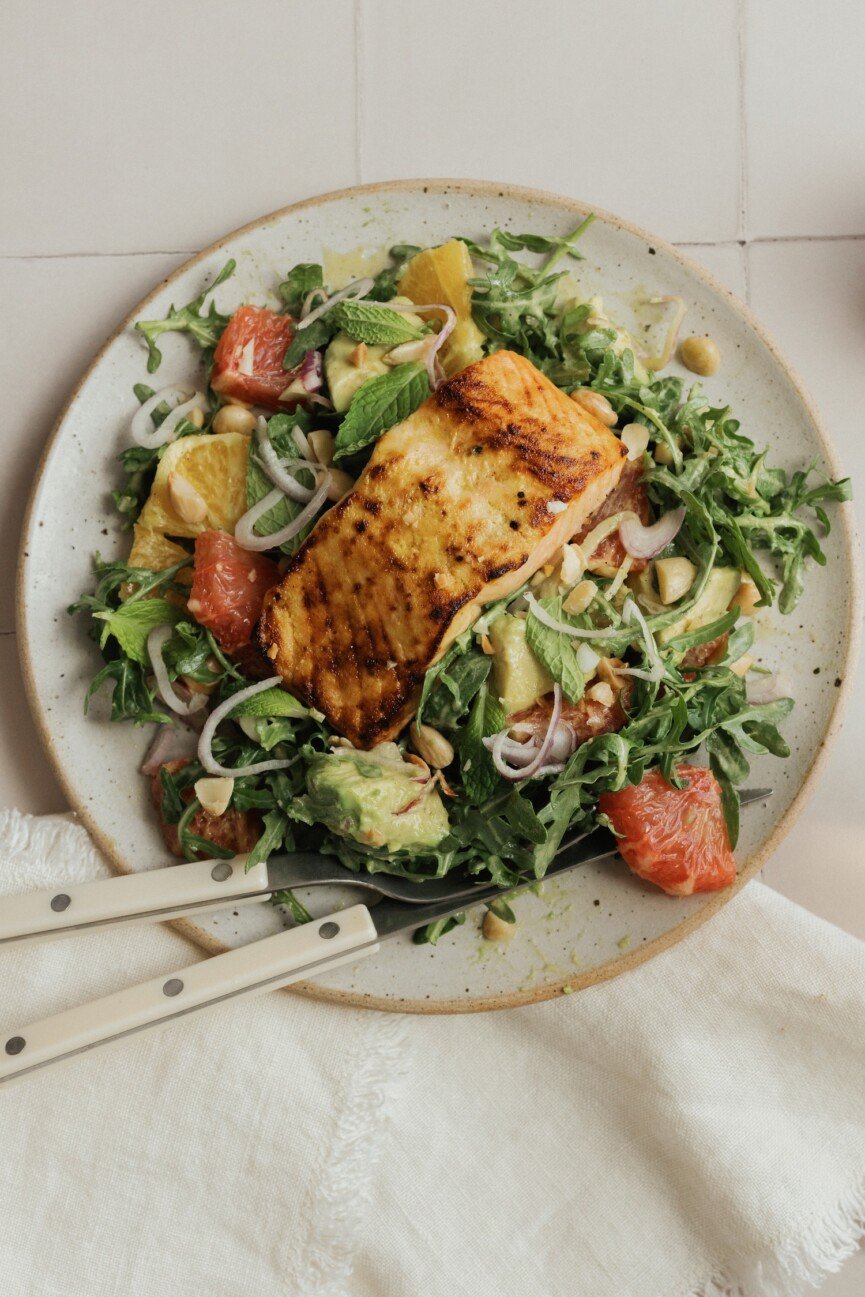
Citrus Salmon Salad With Avocado & Arugula
What makes it party-ready: I love a casual weeknight gathering. An impromptu evening inspired by the alignment of beautiful weather and everyone’s open schedule. But just because it’s laidback doesn’t mean the menu can’t be special. This vibrant citrus salmon salad is a foolproof crowd-pleaser—and comes together in just 30 minutes. The dressing features orange zest and a kick of ginger, giving the entire dish a beautiful fresh flavor that epitomizes warm-weather entertaining.
Make it a feast: Keeping with the theme of elegant ease, I’ll serve this salad alongside a cheeseboard and chilled glasses of strawberry-rosé sangria. For dessert? Mini pavlovas are so much simpler than they seem.
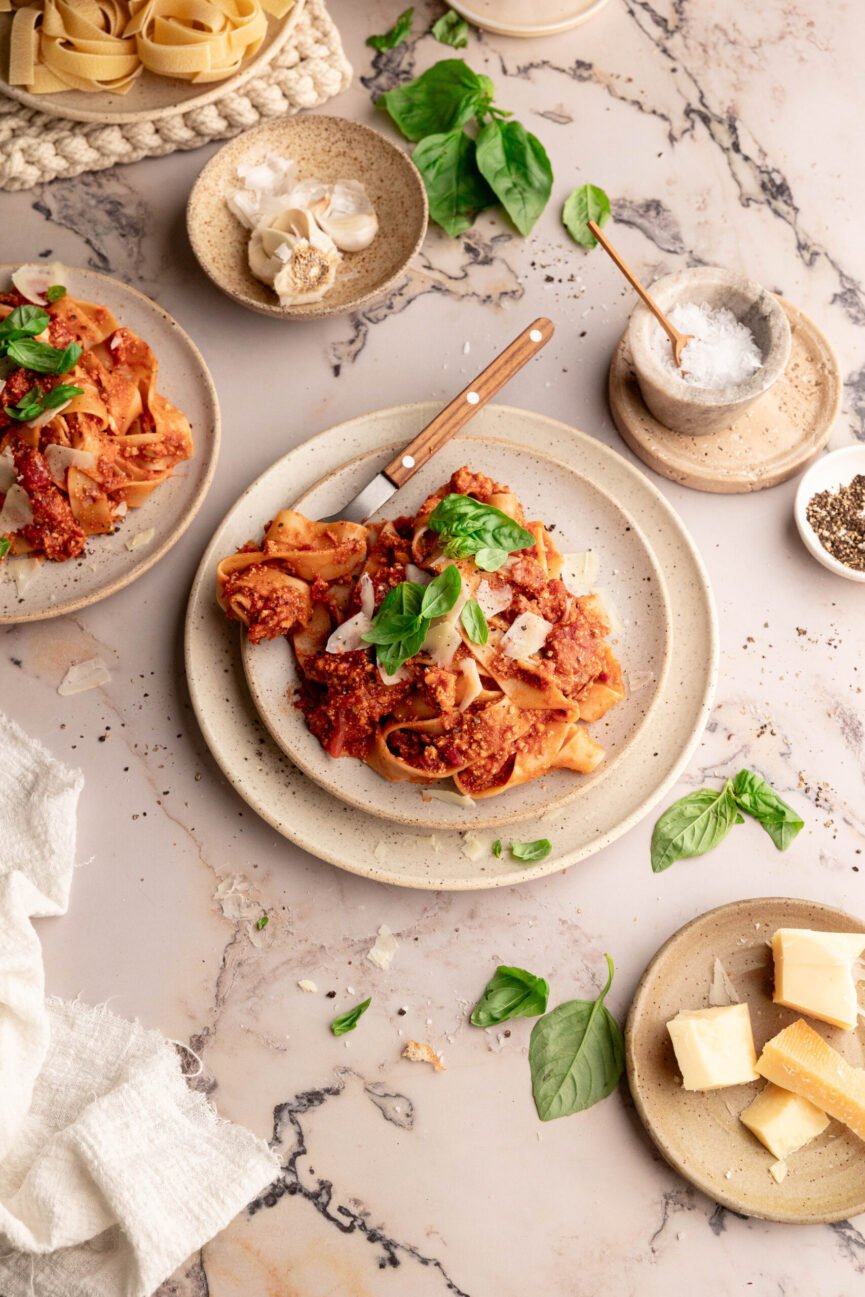
Vegan Tofu and Mushroom Bolognese
What makes it party-ready: Tofu isn’t just a hero ingredient reserved for those who eat vegetarian or vegan—it’s a protein-packed staple with tons of potential that also happens to be highly affordable. Our food editor, Suruchi, nailed this take on the classic spaghetti bolognese that uses mushrooms and crumbled tofu as a beef/pork replacement. The results are incredible.
Make it a feast:
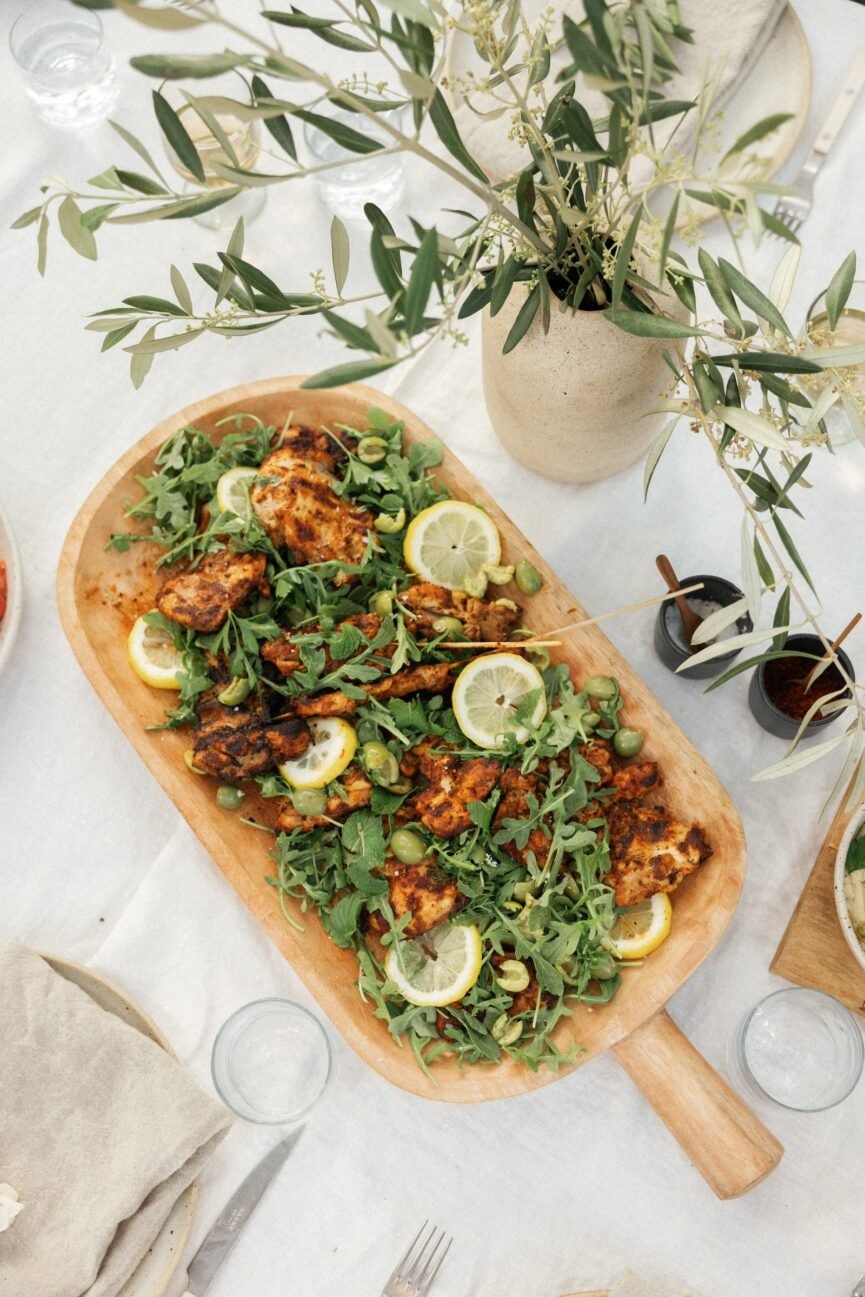
Spice-Rubbed Chicken Thighs
What makes it party-ready: There’s nothing better than an easy grilled recipe. Whether it’s chicken, beef, or fish, taking things outside can save clean-up time in the kitchen while adding an extra element of flavor to your food. Chicken thighs are an inexpensive and easy grilling option that can serve a crowd, and with this spice rub, these will be the hit of any gathering.
Make it a feast:
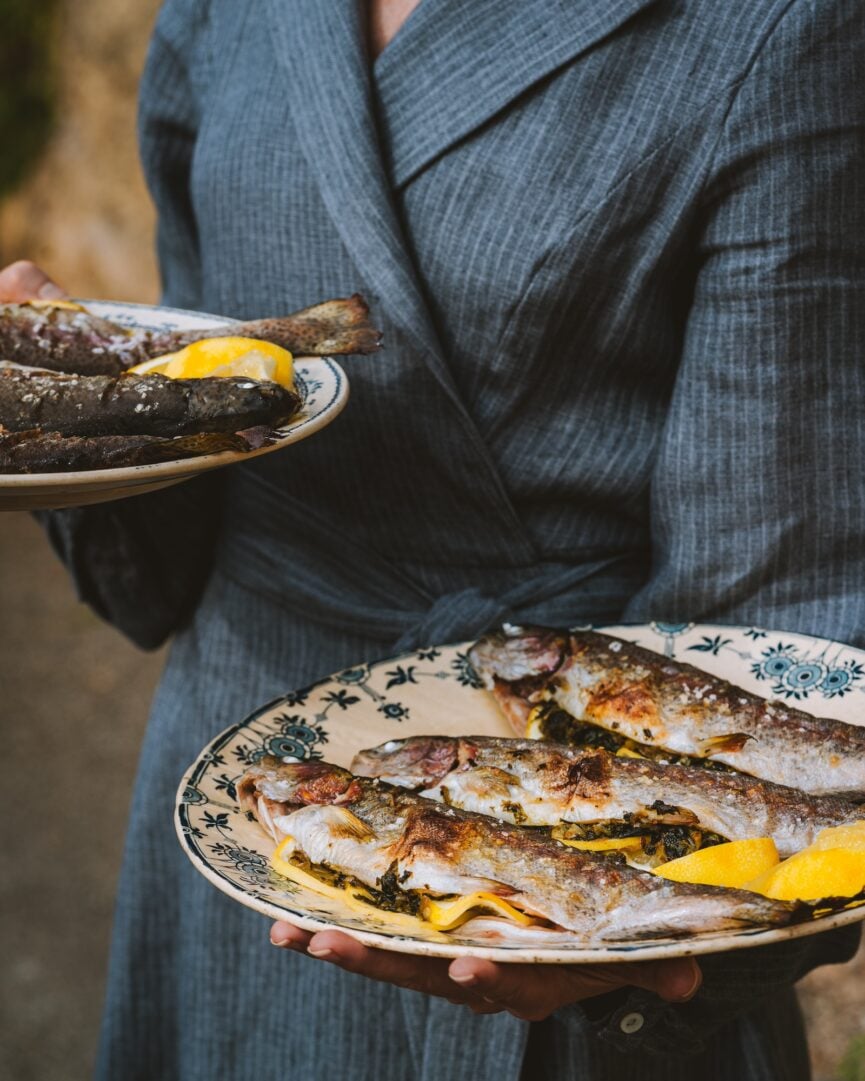
Whole Roasted Fish
What makes it party-ready: Roasted fish is a low-effort, easy way to feed a large crowd. It’s also a dish that doesn’t leave everyone stuffed, meaning more room for sides and dessert. This particular recipe from Rebecca Peppler’s cookbook Le Sud, is served with a simple and delicious homemade pistou that will transport your to the French Rivera.
Make it a feast:
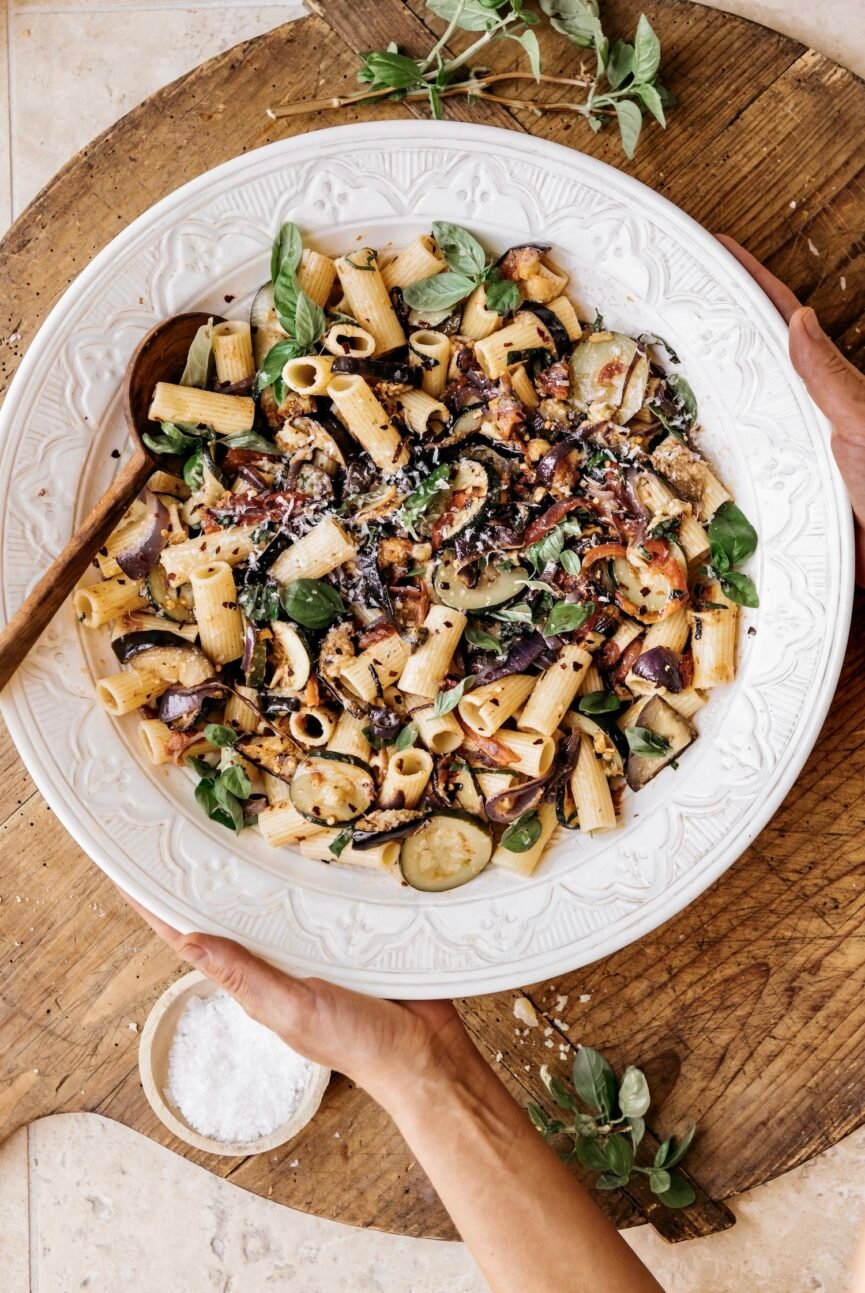
Ratatouille-Style Roasted Vegetable Pasta
What makes it party-ready: At first glance, a pasta dish might not seem special enough for a dinner party meal. But this isn’t just any pasta recipe. While it’s easy to prep and cook, it makes the most of a few flavor-packed ingredients that’ll take your meal up a notch. Plus, the pop of green it brings to your table rivals any floral centerpiece. Major wow-factor.
Make it a feast:
Roast Chicken With Tomatoes, Lemons, & Cilantro Salsa Verde
What makes it party-ready:Everyone loves roast chicken. This one has just enough interesting and surprising flavors to make it feel dinner party-worthy. Those charred lemons—yum!
Make it a feast:
Easy Homemade Pizza
What makes it party-ready:My grilled pizza is truly made for a party. But I’ll admit, it’s a little chaotic to make for more than six people. That’s why I usually bring it out at more intimate gatherings where everyone can get involved. (This pizza party was one of my favorite gatherings ever.) The recipe above is for my homemade pizza dough. Make several dough balls in advance—I usually plan on three doughs for six people—let them rest at room temp for a couple hours before party time and proceed with your favorite pizza toppings and method of cooking.
Make it a feast:
Grilled New York Strip Steaks With Chimichurri
What makes it party-ready: This is probably mine and Adam’s most frequently-made meal for a dinner party. It’s incredibly easy to pull together and fun for everyone to hang out down by the grill while we make it. I usually buy one large New York Strip for every two people. Slice into 1″ pieces and serve on a big platter surrounded by grilled tomatoes. Since this is a pricier cut of meat, it feels really special and I typically reserve it for a smaller dinner party. For a bigger gathering, an affordable cut of steak like flank is a great option, too. (You’ll just want to marinate it beforehand and adjust the cooking time.)
Make it a feast:
Hot Honey Salmon With Coconut Crunch
What makes it party-ready: These salmon bowls are a great meal for a summertime gathering on a hot day. They feel so light and refreshing, but still really special. For a girls’ night, I love to set out all the toppings and let everyone build their own bowls. Not only is it a fun way to get people interacting, but it also allows guests with other dietary restrictions to pick and choose their ingredients.
Make it a feast: One of the beautiful things about this dish is that it’s truly a complete meal in a bowl. The only thing I’d add is refreshing scoops of mango sorbet (or mango-basil ice cream) for dessert!
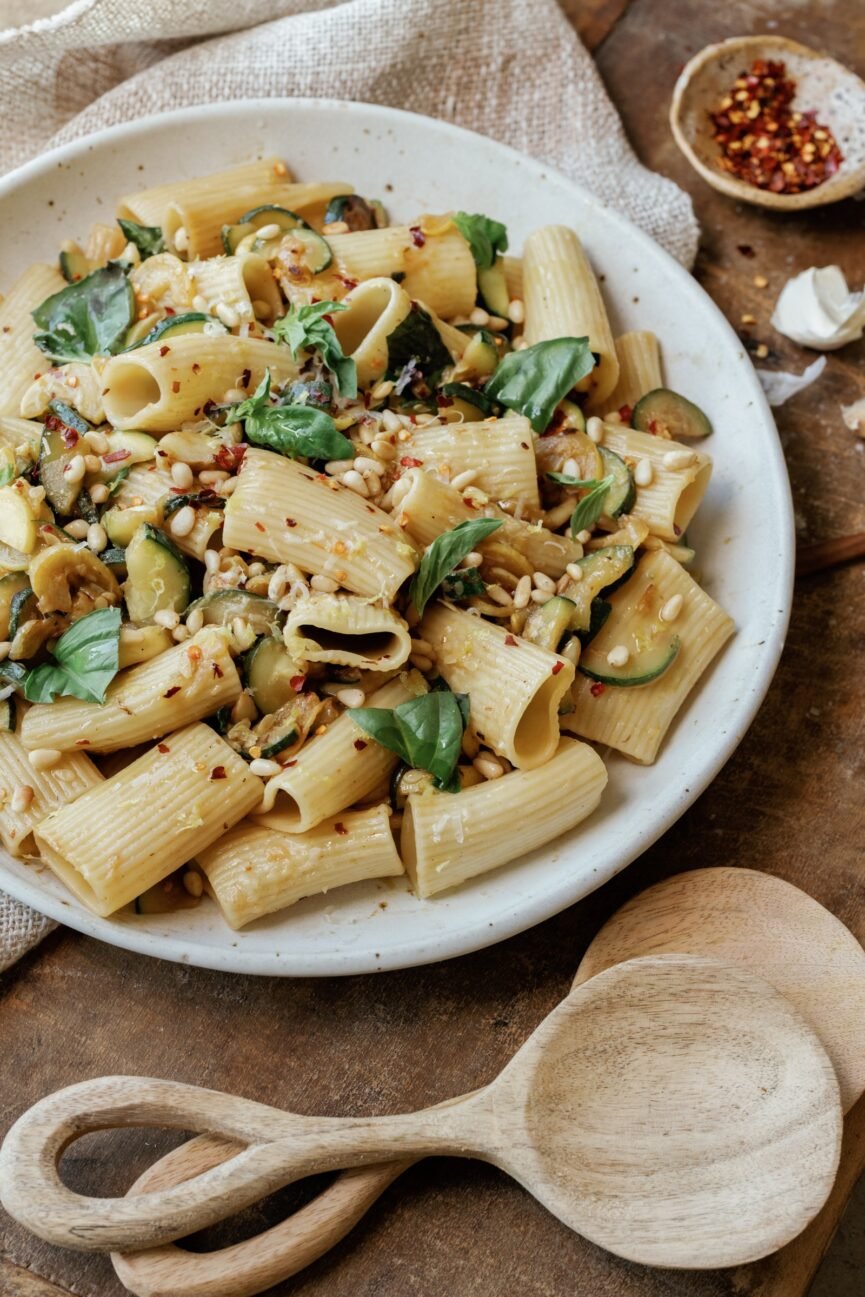
Simple Zucchini Pasta
What makes it party-ready: Sometimes, a party just needs pasta. That said, it’s not ideal for serving a super large group since it does need a bit of last-minute attention (plus, you’d need a really big pan for tossing it all together). This streamlined zucchini pasta combines simple ingredients into one luscious and luxurious bowl that everyone loves.
Make it a feast:A loaf of crusty bread, plus a simple salad with fresh greens (and a bottle of pinot gris).
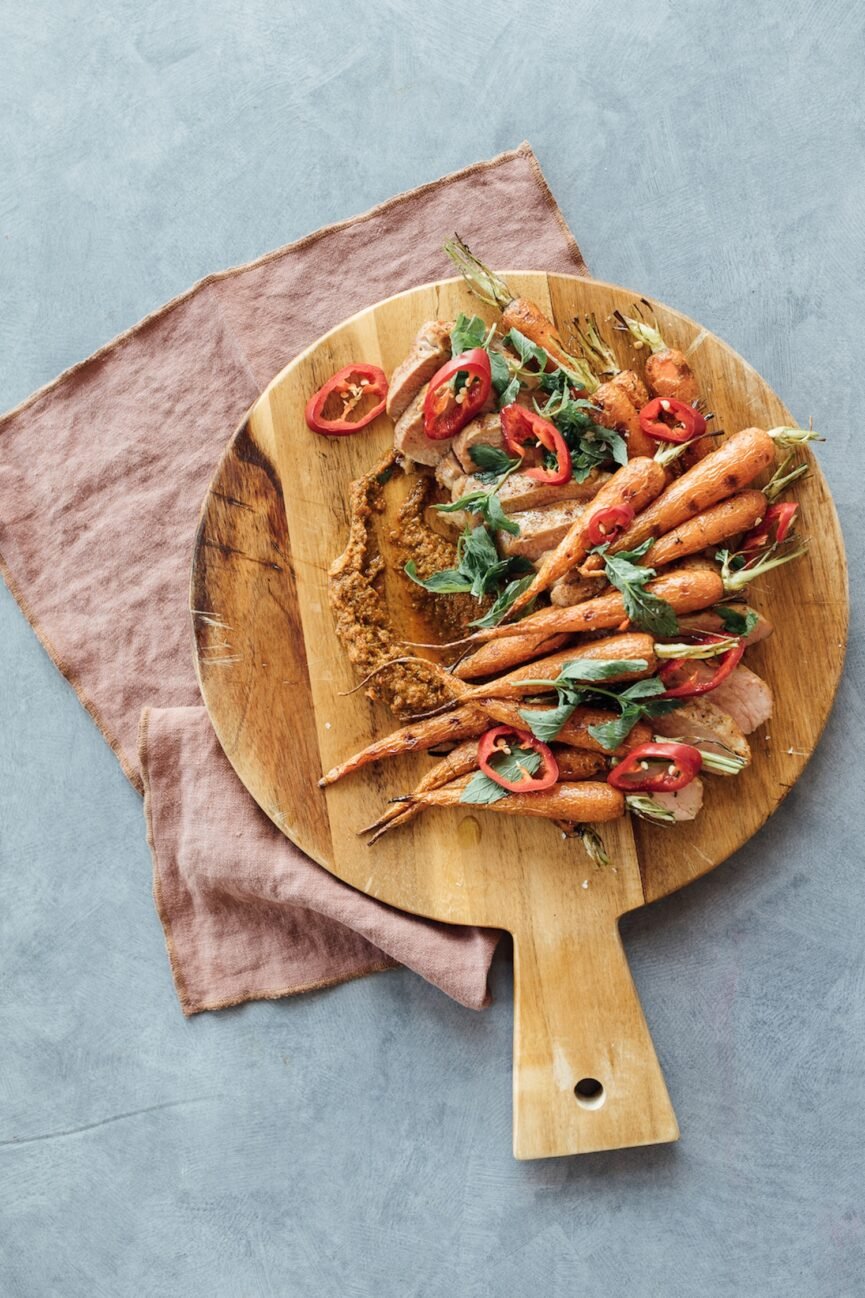
Orange-Chili Glazed Pork Tenderloin With Carrot Pesto and Grilled Carrots
What makes it party-ready: I make this one when my mother-in-law comes over since she loves pork tenderloin. This dish is perfect with a double dose of carrots. It’s a great one to make outside on the grill, but in the cooler months, you can also roast it all in the oven. Pork tenderloin is one of those cuts of meat that is made for serving a crowd. You could easily scale this recipe depending on your guest count, then slice it up and arrange on a big family-style platter.
Make it a feast: The carrots are a super satisfying side dish on their own, and the pesto adds richness and flavor, so you’re almost already in feast territory with just this recipe. For a dinner party, I’d add some herb-roasted potatoes or a simple kale salad.
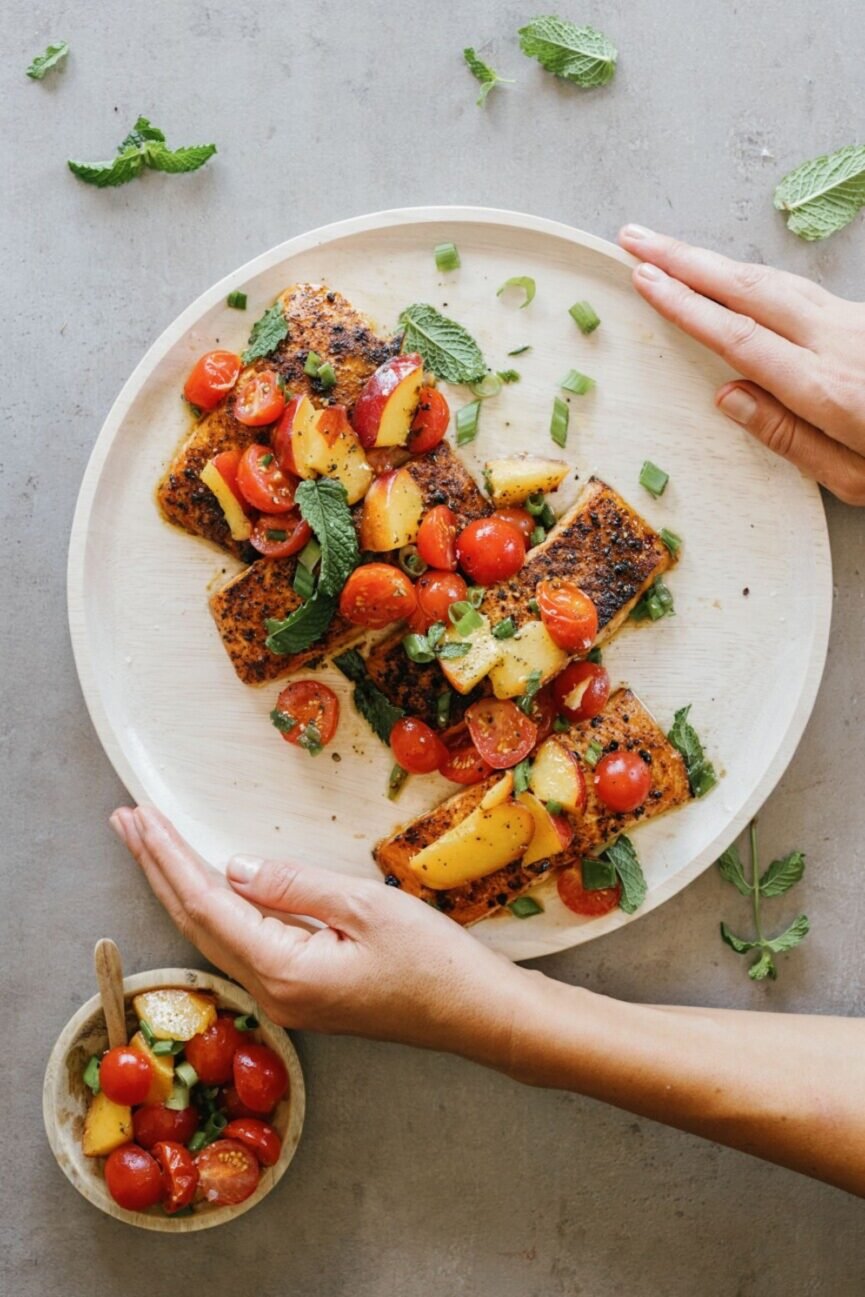
Grilled Salmon with Stone Fruit Salsa
What makes it party-ready: This is one of those super satisfying recipes that feels way fancier than it is. And in my experience, salmon is one of the most universally loved fish dishes. Bonus: it’s foolproof! Grilling salmon on a cedar plank is an easy way to infuse this fish with smoky flavors while ensuring it stays tender and moist. Plus, that stone fruit salsa adds the perfect bit of sweetness to complement the charred fish.
Make it a feast:
I like serving this salmon with a side of herbed quinoa or wild rice. The fluffy texture and nutty flavor offer a satisfying contrast.
For a lighter side, toss together a simple green salad with a citrus vinaigrette to add some tang to the mix.
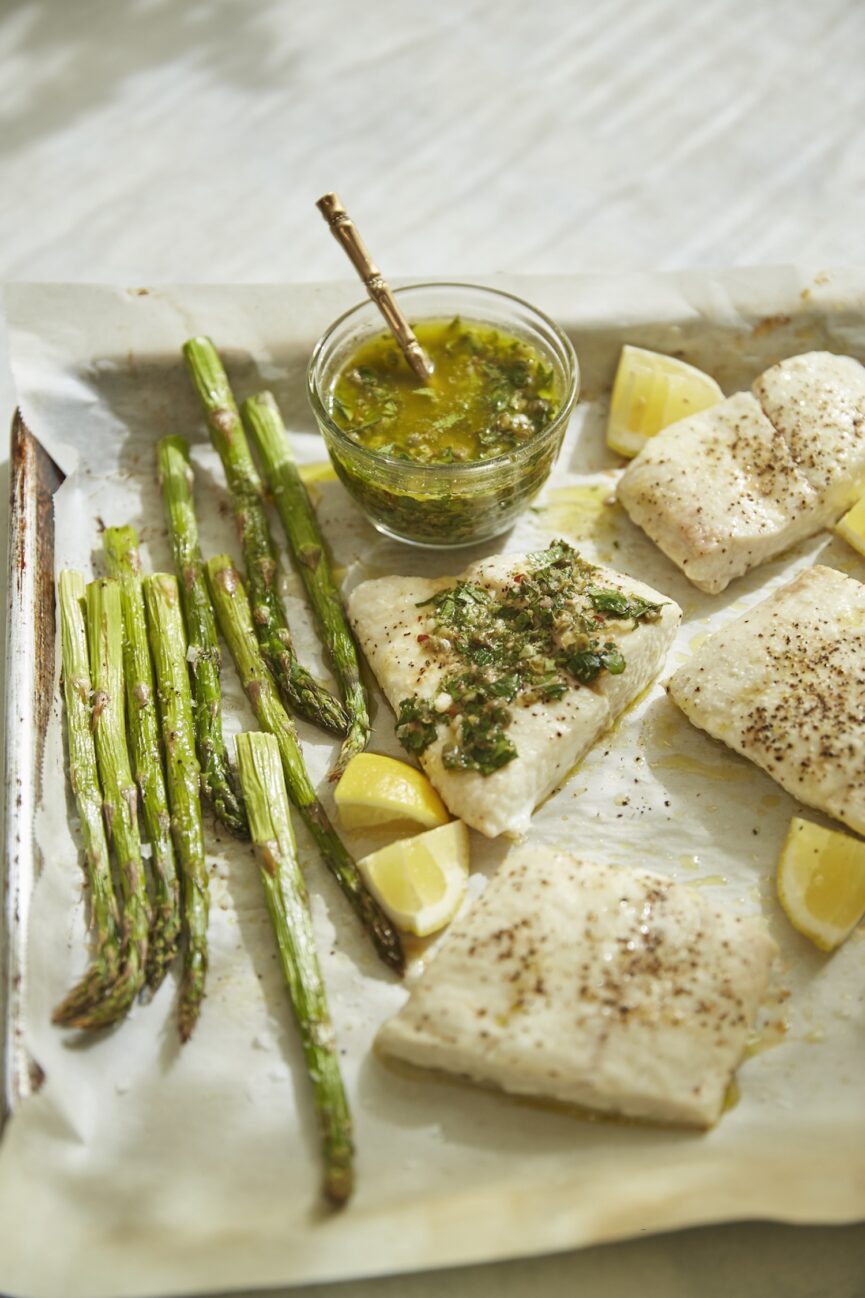
Sheet Pan Halibut With Italian Salsa Verde and Asparagus
What makes it party-ready: Here is one of those super-impressive meals that also happens to take very little effort. Why? Because halibut is one of the best fish ever. Plus, the fact that this is made on a sheet pan allows you to easily make several fillets at once. It has a light, clean flavor and buttery, flaky texture, so it doesn’t take much for it to be delicious. I simply roast mine with olive oil, salt, and pepper, then top it with a bright Italian salsa verde.
Make it a feast: Add some potatoes that can roast right along with the fish on a separate baking sheet. Or, you can opt for a little more green and serve it with a big kale salad.
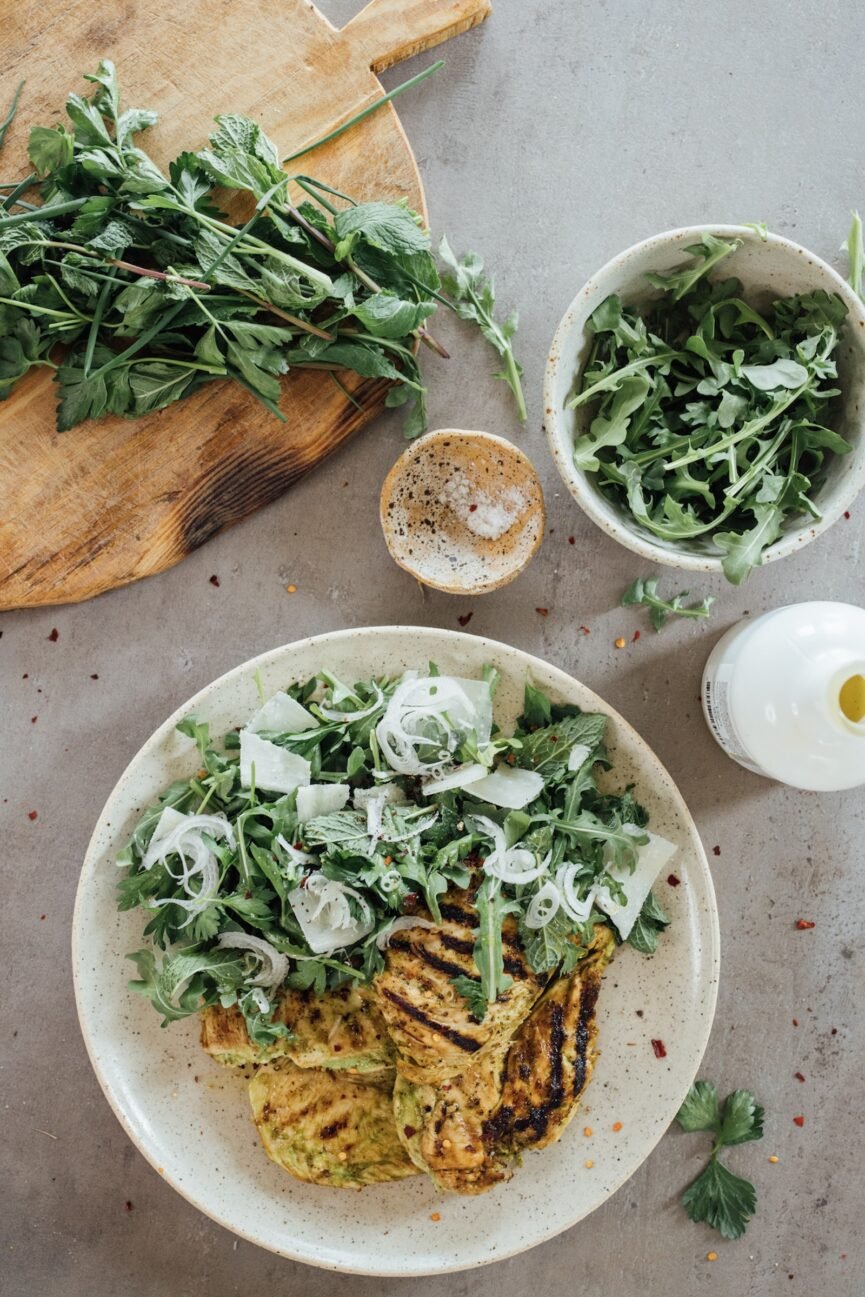
Grilled Yogurt-Marinated Chicken with All the Herbs
What makes it party-ready: If you haven’t tried marinating your chicken in Greek yogurt, this recipe will change that fast. It’s beyond easy (and inexpensive) to throw chicken thighs in a delicious marinade and grill for a crowd. Fresh herbs and honey add a bit of zest and sweetness that complement this juicy chicken.
Make it a feast: Serve this protein with a side salad or crispy roasted potatoes for an all-around simple and delicious meal that everyone will be gushing about.
Sweet & Spicy Braised Short Ribs
What makes it party-ready:Everyone always asks me for this braised short rib recipe after dinner parties, and they’re always shocked to learn how simple it is. I like to add some fresh herbs over the top along with red onion and lemon zest to brighten up the plate. Because presentation matters.
Make it a feast:
Spicy Tuna Tostada with Avocado and Crispy Shallots
What makes it party-ready: Toastadas are a go-to for a few reasons whenever I’m looking to impress my guests with easy dinner party menu ideas. They’re customizable, so everyone can pick and choose what they want to add. This recipe is also a winner for gluten-free guests. Simply swap in a Siete tortilla baked in the oven for a grain-free and gluten-free tostada.
Make it a feast: This Mexican chopped salad is just hearty enough to round out your meal.
Dinner Party Recipes to Feed a Crowd
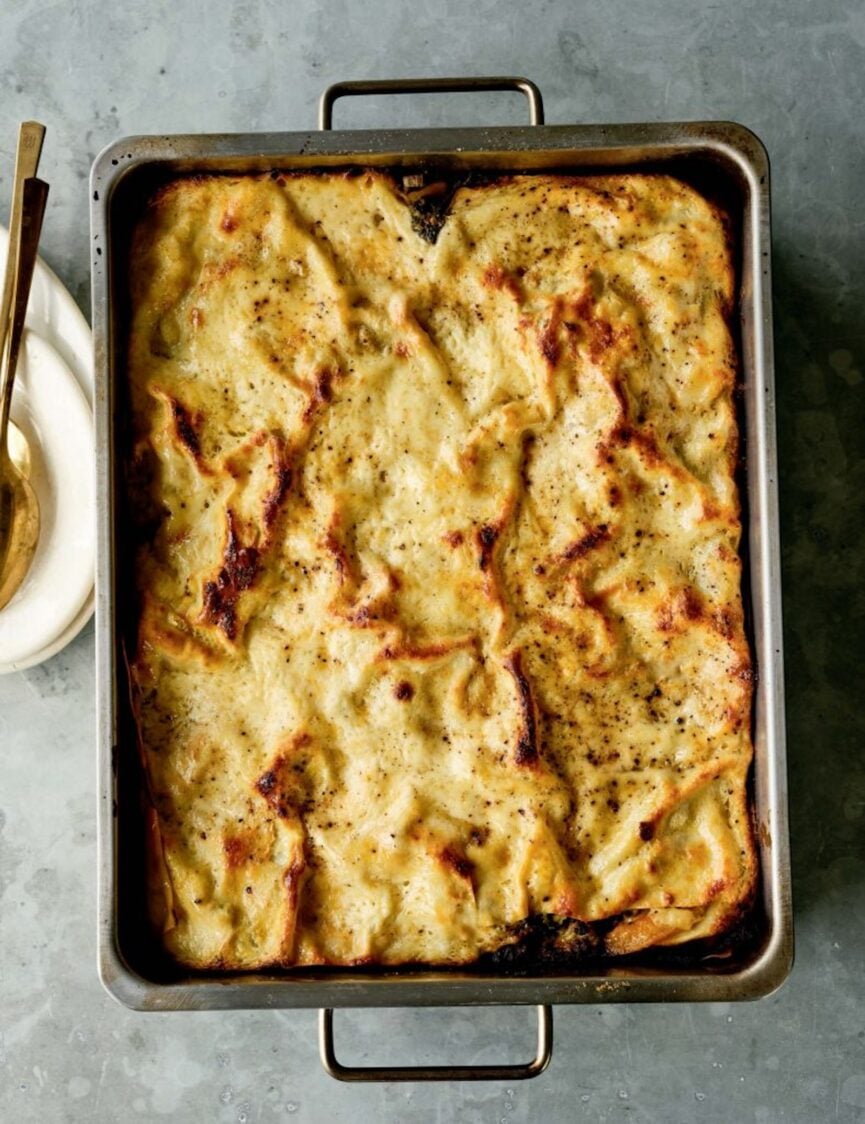
Damn That’s a Keeper Winter Vegetable Lasagna
What makes it party-ready: Lasagna can lean a little labor-intensive, but take heart: this dish can be made in advance. In my experience, all variations on the classic lasagna are winners—but this spin is my favorite take yet. It’s hearty and warming without any meat, and the filling makes the most of everyone’s favorite fall veg, butternut squash. The flavors are rich and complex—and if you’re feeling up to it, the recipe also shows you how to make the pasta yourself. It’s a dish worth bragging about.
Make it a feast: Cut the lasagna’s richness with a bitter side, like this radicchio salad. Or, if you want to send the fall flavors home, this apple and arugula salad is one of my favorites.
Danielle Walker’s Turkey Chili Verde
What makes it party-ready:When the colder months hit, I love serving dishes that evoke elevated comfort. They’re simple and warming, but just special enough. This flavor-packed chili comes courtesy of Danielle Walker, our go-to for paleo-friendly, delicious recipes. If you want to make it vegetarian, simply omit the turkey and bump up all the veggies. Danielle suggests either diced zucchini or minced portobello mushrooms. Yum!
Make it a feast: Salty tortilla chips or your favorite cornbread are ideal for dipping. Top each bowl with sour cream or Greek yogurt, cilantro, and a squeeze of lime
Slow-Cooker Chicken Tikka Masala
What makes it party-ready:Even those who aren’t well-versed in Indian cuisine will love chicken tikka masala. Although I frequently make this recipe on a busy weekday for our family, it’s also perfect for a big feast. (Triple or even quadruple the recipe—your slow cooker can handle it!) Plus, the fact that you make this several hours before dinner and it cooks away while you’re free to do other stuff is pretty awesome.
Make it a feast: An Indian-inspired feast means serving one or two other dishes like Saag Paneer, Samosa Chaat Fries, or Indian Butter Cauliflower. Also required: warm naan and a big pot of rice.
Easy Mexican Chicken Tortilla Soup
What makes it party-ready: I’ve made this soup for countless book clubs, family gatherings, and friends who have just had babies. Everyone says it’s the best chicken tortilla soup they’ve had, and it’s just as easy to make a big batch by scaling the ingredients. Sure, a pot of soup may not sound like a party, but watch me make it here and see for yourself how festive all those beautiful ingredients look together. Plus, the smorgasbord of colorful toppings lets guests have fun building their own perfect bowl of soup.
Make it a feast: I usually serve this soup on its own—with all the toppings, it feels complete! But it’s never a bad idea to kick off a Mexican-style feast with really good chips, a couple of great guacamoles, and salsa.
Whole Roasted Side of Salmon With Citrus, Chiles, and Herbs
What makes it party-ready: During my catering career, I learned that one of the best ways to feed a crowd elegantly is with a big roasted side of salmon. It looks impressive coming out of the oven and is the perfect centerpiece to a buffet. If you’re intimidated by buying a side of salmon, don’t be! There’s nothing to it, you literally just ask the fishmonger for “a side of salmon”—I usually plan for five to six ounces per person. (You may even be able to convince them to remove the skin for you!) This one, with roasted citrus slices, is a great main course option for Easter or Mother’s Day. I’ve also served it with great success for cozy girls’ nights with a bottle of pinot noir.
Make it a feast:
Lime-y Chicken Tacos With Jicama, Avocado, and Mint
What makes it party-ready:I love a taco night-themed party. When it comes to dinner party recipes, few dishes are more festive, and this surprisingly delicious combo of chicken, jicama, avocado, and mint elevates the entire setup. For a group, I usually set out a couple of big platters on the table with all the ingredients, pass around the tortillas, and let everyone assemble their own tacos family-style.
Make it a feast: For a larger group, I like to offer a vegetarian option since there’s usually at least someone who’s not eating meat. Taco night makes it easy: you can roast some cauliflower and let guests build these delicious all-veg tacos if they so choose. I love them just as much as the chicken, so I’ll usually eat one of each.
Lamb Meatballs in Tomato Sauce With Fresh Ricotta
What makes it party-ready:A couple of years back, chef Seamus Mullen served these unbelievably delicious lamb meatballs as the centerpiece to a dinner party he hosted in Santa Monica. As someone who doesn’t cook with lamb very often, I came home feeling inspired to make this spicy lamb meatballs recipe for my next gathering. Although they feel special occasion-worthy, they couldn’t be simpler.
Make it a feast: Take a cue from Chef Mullen’s dinner party and serve with whole roasted cauliflower with salsa verde and a zesty radish, fennel, and grapefruit salad. Or, you could go more classic Italian and serve it on top of a big bowl of olive oil-tossed spaghetti.
Pita and Kebab Board
What makes it party-ready:The last thing we want to be doing at a party is worrying about lots of different meal components coming out of the oven at exactly the right time. One solution? A dinner board that contains everything guests need to build their own perfect plate. This easy and flavor-packed pita and kebab version is not only gorgeous, but it’s also perfect for satisfying a range of dietary needs. Vegetarians on board? Make them meatless. Gluten-free friends can skip the pita. The list of variations is truly endless.
Make it a feast: This board has it all: hummus, feta, roasted tomatoes, olives, sliced cucumbers, diced veggie salad, and roasted garlic. What more could you ask for?
Carne Asada Tacos
What makes it party-ready:Oaxaca has quickly become one of my favorite places to visit. With its vibrant culture and diverse food scene, there’s so much for travelers to soak up. Alongside all the beautiful, artisan-made goods I’ve sourced for Casa Zuma, I’ve also found inspiration in the many meals I’ve happily devoured. Case in point: bold and bright carne asada tacos that benefits from a mix of herbs, garlic, and plenty of spices. These are perfect for al fresco dining season.
Make it a feast:
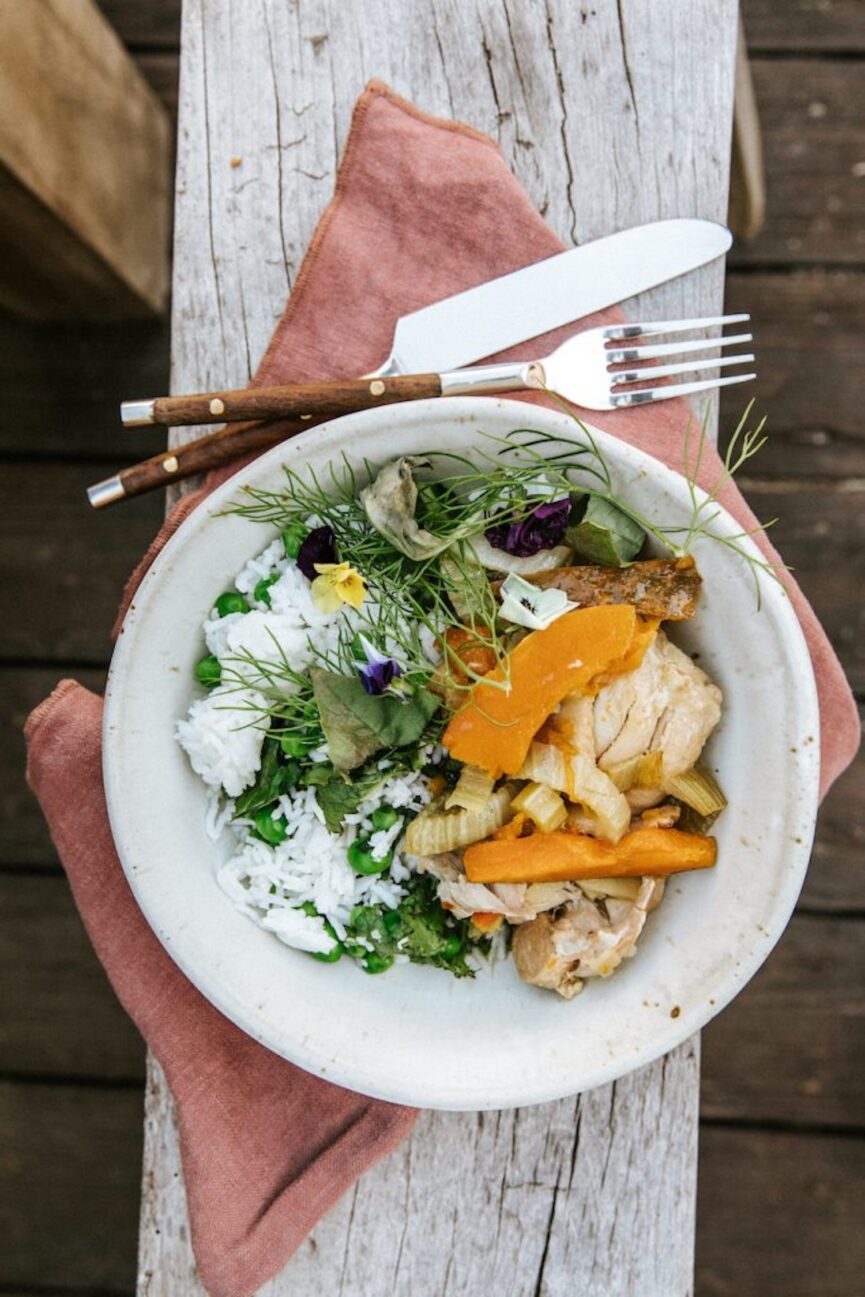
Chicken Fire Stew
What makes it party-ready: This stew is a stealth pick for party food. It feels like the comfort food your mama might have made, but when presented with as much style as Shelley Armistead did at her beach dinner, it’s suddenly elevated to special occasion status. What makes this dish perfect for a crowd is that you can truly throw everything in the pot and walk away. An hour later, dinner is served. Shower with herbs and edible flowers—both for flavor and a gorgeous presentation.
Make it a feast: Serve alongside spring rice with greens and peas.
Grilled Shrimp Tacos with Grapefruit-Avocado Salsa
What makes it party-ready: These shrimp have been on repeat in my kitchen this summer. Their flavor is incredible and the endless amount of toppings makes it perfect for just about everyone. Trust me, this is THE grilling recipe for all of your outdoor dinner gatherings.
Make it a feast: Guacamole, or any other Mexican-inspired dip, can be served either on your taco or as a side dish with chips. I also love serving these tacos with a Mexican chopped salad to add some extra greens to the table.
Skillet Eggplant Lasagna
What makes it party-ready: One-pan dishes that serve a crowd make dinner party hosting incredibly easy. If you’ve never tried eggplant lasagna, this recipe is a great place to start. It turns a classic dish into something both stunning and healthy. You’ll never cook your lasagna the same again.
Make it a feast: With a heavier dish, I always serve something on the lighter side as my side dish or appetizer. Perhaps an easy bruschetta or a simple salad to spruce up your table and keep guests wanting more.
This post was last updated on April 4, 2025 to include new insights.
Honestly, there’s no such thing as the “perfect” cookie. There are too many personal preferences that dictate to different people what, in fact, is considered perfect for them. My brother disdains a thick, Levain-style cookie while I LOVE their thick and chewy texture. My dad craves a classic soft chocolate chip cookie, but I prefer them thinner and chewier. And when it comes to flavors, many people prefer the simple and classic, while I love finding ways to have fun with surprising flavors. So, I’ll start with this. These pistachio cookies are the perfect cookie (to me), and I hope they bring the same joy to you.
Pistachio-flavored everything is certainly having a moment thanks to treats like the Dubai chocolate bar. Its mild, yet earthy flavor makes it perfect for pairing with different ingredients, and its muted green color is also fantastic. But I wanted a cookie that screamed pistachio in every way possible. These cookies celebrate pistachio but also elevate it with a few ingredient additions. Chewy in texture, perfectly sweet, and bright in flavor, these are the ultimate.
Ingredients You’ll Need for These Pistachio Cookies
The ingredient list for these cookies is pretty short, though you’ll need a couple extras to take them over the top.
Sugar. We’re using both granulated and brown sugar here.
Olive oil. I love the flavor of olive oil in these cookies. Use a good one, its savory flavor will really compliment the pistachios.
Orange. I did test these cookies without orange zest, and found that the slight brightness that a bit of zest added was non-negotiable for me. It adds the perfect flavor without going overboard.
Cardamom. A little goes a long way, and I really think a little cardamom complements and uplifts the pistachio flavor in the best way. Use the fresh stuff, I promise it’s better!
Salt. Do not skip the salt in any baked good, but especially in these.
Vanilla. Optional, but I like a little bit of vanilla in these. Powdered vanilla powder is a new favorite of mine, and a little goes a long way.
Egg. Just one for this recipe.
All purpose flour. The base of our cookies!
Pistachios. But also, we’re supplementing a portion of flour in these cookies with ground pistachios. This ensures that you get little bites of pistachio in the cookies without huge chunks, and it adds to the flavor.
Baking powder and soda. To help our cookies rise.
Pistachio butter. It’s very easy to make your own, though you can also use store-bought.
A Few Tips for Cookie Success:
I tested these cookies four different ways. Yes, that’s a lot of cookies. But there were different variations and methods I wanted to try to ensure the most optimal cookie.
Combine the orange zest into the sugars before adding the olive oil and eggs. By rubbing the zest into the dry sugars until it feels like wet sand, you’ll release some of its natural oils and flavors.
Chill the cookie dough. I often skip this step when I make cookies because the difference feels nominal at best to me most of the time. But for these cookies, it really makes a difference, especially because we’re using olive oil instead of butter. Chilling the dough helped the flavor, texture, and rise so much more than when I tested not chilling the dough, so please don’t skip! Yes, you’ll still get a good cookie if you don’t chill it, but think about how much better it could be!
For even more pistachio flavor, I like to add ribbons of pistachio butter to the finished dough. Instead of mixing it thoroughly into the cookie dough, just swirl it in with a spatula so you can still see the butter.
In addition, I like to make a little topping mix with ground pistachios, demerera sugar, zest, and salt. This also helps the cookies look even prettier with the ingredients that are inside of the cookie visible on the outside. This step is optional, but I think it’s fun!
Tap your baking sheet in the oven and on the counter when removing them from the oven. I love the pan-banging cookie trend from Sarah Kieffer. It gives your cookies these lovely ripples and chewy texture while rising that I think is so perfect. Tap the baking sheet on the rack while in the oven twice, and then when you remove them from the oven, gently on the counter.
If you want to keep your cookies round in shape, use a cookie cutter or glass to shape the cookies while hot out of the oven. Yes it’s optional, but if you care about the ~aesthetic~ it’s a simple way to do this!
How to Store These Pistachio Cookies:
Once the cookies have cooled, I like to store these in an airtight container for a few days at room temperature. If I’m going to keep them around longer, I would just freeze the dough in scoops and store them until ready to bake.
To freeze cookie dough, I like to scoop dough out onto a lined baking sheet and let chill in the fridge. Then, move the baking sheet to the freezer until frozen solid. From there, remove the scoops from the sheet and store in an airtight container or Ziploc for easy single-serve cookies at a moment’s notice. You may need to bake these a few minutes longer when baking from frozen, but just keep an eye on them.
Keep reading for the recipe, and let me know if you give these a try!
Print
Description
An easy pistachio cookie with orange zest and cardamom.
1/2cup granulated sugar (100g)
1/2cup brown sugar (90g)
Zest of 1/2 orange
1/2cup olive oil (4oz)
1/2 tsp salt
1/2 tsp ground cardamom
Splash of vanilla
1 egg, room temperature
150g flour (1 1/4 cup)
1/2cup finely ground pistachios (50g)
1/2 tsp baking powder
1/2 tsp baking soda
1/4cup pistachio butter
For the topping:
1/4cup finely ground pistachios
zest of 1/2 orange
1 tablespoon demerera sugar
big pinch of salt
Prepare the cookie dough. In a large mixing bowl, add the granulated and brown sugars with the orange zest. Using your fingers, rub the zest into the sugar until it feels like sand and is fragrant. Add the olive oil, salt, cardamom, and vanilla. Whisk together until combined. Add the egg, and whisk until smooth.
Add the flour, ground pistachios, baking powder, and baking soda. Using a spatula, fold the dough together until just combined. Ribbon the pistachio butter over the finished dough, and fold it into the dough but don’t completely combine it – you’ll want to see the pistachio butter visible! Put the bowl into the fridge and chill for at least 30 minutes.
Preheat oven to 350 degrees F. Line a baking sheet with parchment paper.
In a small bowl, add the topping ingredients and combine the mix.
Using a cookie scoop, scoop dough and dip into the topping mix before placing the cookies onto sheet about 2 inches apart – the cookies spread a little bit. Bake on the middle rack for 12 – 13 minutes, tapping the sheet tray on the oven rack at the 8 minute and 10 minute mark. Do not over bake these cookies! Remove from oven and tap the sheet tray on the counter. Let cookies cool on the sheet tray for about five minutes before cooling completely on a wire rack. Enjoy!
My husband doesn’t really care when I dutifully report to my daily cleaning apps to keep a tidy home that serves our family. It matters not to him if I meal plan at the beginning of the week to take the guesswork out of dinner. But when we sit down to discuss our schedules, our kids, how we’re feeling in our relationship, and so many more things in our weekly marriage meeting, he is totally invested. Just last night, I swear he was batting eyes at me as we sat on the couch, discussing our future plans.
If you’re at all familiar with the five love languages, chances are you just guessed mine—and most certainly, his.
Understanding Love Languages
Knowing your primary love language is just the first step. Mine is acts of service; his is quality time. And while he does appreciate the small things I do to keep our home running smoothly, those aren’t the actions that make him feel the most loved. That’s where the second step comes in: learning to speak your partner’s love language—aka, your “secondary language.”
What are the five love languages?
The five love languages, as introduced by Gary Chapman, Ph.D., in The Five Love Languages: The Secret to a Love That Lasts, are different ways we give and receive love:
Physical Touch
Quality Time
Gifts
Words of Affirmation
Acts of Service
Chapman developed this framework through years of marriage counseling and studying how people communicate love. Understanding your love language and your partner’s can unlock a deeper connection and make both of you feel more valued in your relationship.
Why Knowing Your Love Language Matters
We all want our partners to feel loved, but Chapman takes it a step further: When we feel fully loved, our potential expands. When your “love tank” is full, you’re more confident, motivated, and emotionally secure.
When we speak our partner’s love language, we foster a relationship that thrives beyond the initial “honeymoon phase.” Chapman suggests that the “true love” phase typically lasts about two years. When you first fall in love with someone, you’re more likely to speak your love loudly. Staying up all night on the phone, holding hands in public, dropping by surprise gifts, booking weekends away, and more. It’s hard to decipher what truly makes you feel loved when you’re on the receiving end of all of it.
After that, intentional love takes over—the kind that sees, sacrifices, and stays consistent. That’s when the good stuff happens, a rich well of deep love that goes beyond the butterflies.
Love languages can be a valuable tool to get you to that next phase.
How to Find Your Love Language
If you’re unsure of your love language, take the official quiz online. But quizzes aren’t the only way—pay attention to what makes you feel most appreciated and valued. Do you light up when your partner spends uninterrupted time with you? Do small gestures mean the world to you? Observe yourself to understand which love language resonates the most—a similar approach to truly understanding another powerful too, your Enneagram number.
Most people have a primary and a secondary love language. While you might resonate with more than one, chances are one will feel the most meaningful.
Love Languages Explained
Let’s break down each love language and how to use it effectively in your relationship.
Quality Time
If quality time is your love language, you feel most loved when:
Your partner looks you in the eye and truly listens when you speak.
You get to spend uninterrupted time together—whether it’s a walk, a dinner date, or a weekend getaway.
Your partner engages in activities you enjoy.
How to show love to a partner who values quality time:
Give them your full attention—put away distractions.
Schedule regular date nights or quality conversations.
Plan an activity you know they’ll love.
Start small by giving them your full attention when they’re talking. If you can’t give them your attention, let them know you want to be fully present and you just need x-amount of minutes to wrap up what you’re doing.
Take it a step further and schedule a date night or put a weekend getaway on the calendar. Even better if it features an activity (walking, painting, watching football, etc.) that you know your partner enjoys.
Gifts
If gifts are your love language, you feel most loved when:
Your partner brings home a thoughtful souvenir from a trip.
You receive a handwritten note or a small token “just because.”
Unexpected gifts make you feel seen and appreciated.
How to show love to a partner who values gifts:
Pick up their favorite coffee or treat on the way home.
Surprise them with small, meaningful presents.
Give gifts that reflect thought and effort, not just expense.
It’s important to debunk the idea that a gift-lover is selfish or vain. For the person whose love language is gifts, the driving force is the idea that you thought of them or considered them. And that’s exactly where to start small: think of the person you love the next time you’re at the grocery store or on a walk. Grab their favorite chocolate bar at the checkout or pick a flower for them on the way home. Gift-giving doesn’t always need to be a grand gesture.
Take it a step further by showing your appreciation more regularly, not just for special occasions. Challenge yourself to give your partner a gift every day for a week and just see what happens.
Words of Affirmation
If words of affirmation are your love language, you feel most loved when:
You receive genuine compliments and encouragement.
Your partner expresses appreciation for what you do.
A simple “I love you” or “I’m proud of you” brightens your day.
How to show love to a partner who values words of affirmation:
Offer compliments and encouragement regularly.
Express gratitude for both big and small things.
Leave love notes or send meaningful texts.
Start small by acknowledging to yourself that words matter more than you realize. Keep these thoughts on your mind and pay attention to how you use them. Begin by giving praise and compliments—and then keep them coming.
Even though it might not come naturally to you, “words of affirmation” is a language you can learn. By offering encouragement and kind words regularly, you will feel more natural, and your partner will feel the love.
Acts of Service
If acts of service are your love language, you feel most loved when:
Your partner helps with daily tasks without being asked.
They take on responsibilities that ease your burden.
Thoughtful actions—like running an errand or fixing something broken—show they care.
How to show love to a partner who values acts of service:
Identify what tasks stress them out and offer to help.
Take over a recurring chore to lighten their load.
Anticipate their needs and act on them.
Start small by pinpointing the thing your partner complains about the most—is it doing the laundry? Keeping a clean car? Paying bills? Offer to help or better yet, just do it.
Take it further by removing one ongoing task from your partner’s plate. Maybe it’s helping with the chores by owning all lawn maintenance or unloading the dishwasher every morning. Bonus points if you can take something they dislike doing. You’ll make them feel cared for by creating more space and room in their daily routine for doing things they love.
Physical Touch
If physical touch is your love language, you feel most loved when:
Your partner holds your hand, hugs you, or cuddles.
A simple touch—like a hand on your back—feels reassuring.
Physical closeness strengthens your emotional connection.
How to show love to a partner who values physical touch:
Offer hugs and kisses frequently.
Hold hands while walking or sitting together.
Initiate physical intimacy and affection regularly.
Start small by giving hugs just because. Grab your partner’s hand when you’re out in public. Steal kisses. Smack their butt.
Take it a step further by being the one to initiate sex. Learn what your partner likes (and what you like!) and don’t be afraid to show your love through physical affection.
Should you read The Five Love Languages book?
If you’re already familiar with the concept, then the book serves as a simple guide but may feel outdated in parts. Instead of reading, invest your time in applying the principles—observing, learning, and adapting to your partner’s needs.
Can love languages change over time?
Unlike your Enneagram number, a person’s love language can change over time. Life’s changing circumstances can change the way we give and receive love, from different seasons to personal growth to our environments and how we move within them.
Here are a few reasons love languages may evolve:
Big Life Transitions: Becoming a parent, moving to a new place, changing careers, or caring for a parent can all alter your emotional needs. Personally, acts of service soared to the top once I became a parent (and with it, my husband’s need for quality time).
Healing Past Wounds or Evolving Emotional Needs: Working through trauma can significantly change the way we receive love. For example, someone experiencing insecurity, pain, or high levels of stress might value words of affirmation above all else. With time and healing, those needs can shift.
Relationship Dynamics: As your relationship matures, so does your love. Check in often with your partner to see if any new preferences have developed. Make it fun by offering love in various languages and see which ones they respond to the most—and vice versa.
It’s helpful to take inventory with yourself and your partner about once a year to help ensure that you’re both giving and receiving love in the most meaningful way.
Final Thoughts
Understanding and applying the love languages can transform your relationship. It’s not just about knowing your own language but actively learning to “speak” your partner’s. When both people feel seen and valued, love grows deeper, stronger, and more intentional.
This post was last updated on April 3, 2025 to include new insights.
It’s easy to make your bedroom’s design an afterthought. It was for me, anyway. I used to pour most of my design energy (and budget) into the more “public” rooms of my home because those were the spots that other people would see. Guests will roam through the kitchen, our living and dining room, even the downstairs powder room. But the bedroom is private, just for us—so I didn’t prioritize it. I didn’t realize this meant that, in a way, I was putting the needs of others before my own. Just because the bedroom is solely for my husband and I doesn’t mean that it deserves less love and care than our shared spaces. Perhaps, it actually means it needs more! Once I gave myself permission to makeover our space, bedroom decor ideas came flooding in.
Your bedroom should be a retreat—a place that feels calming, beautiful, and deeply personal. Whether you’d like to make small updates or give it a full refresh, simple changes can transform the energy of your room. Take it from me, there’s no need to wait to create the space of your dreams. As you continue to give your home the spring refresh it deserves, here are eight bedroom decor ideas that will breathe new life into your sanctuary.
Feature image from our interview with Sanne Vloet, by Michelle Nash.
Embrace Neutrals
If you need bedroom decor ideas, Camille’s is the perfect place to start. Her space could be the blueprint for a cozy and serene neutral bedroom. Neutral tones will keep your space from feeling too busy, and earth tones specifically will emit warmth and coziness.
To give your own space the same vibe as Camille’s, embrace texture. Texture will keep a neutral space from feeling one-note, and Camille’s bedroom is full of different ones. Linen bedding, the knit blanket at the end of the bed, the cozy rug, gauzy curtains, and the warm wood tones of the bed all work to add variety and make the space feel balanced and inviting.
Take Advantage of Your Space
No matter how large or small your bedroom is, you want to utilize the real estate you’re given. That is to say, maximize every inch of your space! Whether you have large windows like Camille, or simply an empty corner—reimagine how you’d like to live in your bedroom. Would you like to romanticize how you get ready each day? Maybe your bedroom could use a vanity. Do you like to meditate or journal in the morning? A large, oversized chair in the corner would be a perfect addition. Or, perhaps you have extra wall space and a small desk for a mini office area.
When I’m refreshing my space, one of my favorite things to do is to simply inhabit a corner or a spot I don’t normally go. The bedroom is the perfect place for this—stand in an empty corner, sit by an open wall space, and simply look around from a new perspective. What do you see? How do you imagine yourself living in this space? Let bedroom decor ideas come to you naturally. You may be surprised by what you learn!
Add a Plant
Bedroom decor ideas don’t have to break the bank. I’m a firm believer that every room in your home should have at least one plant in it. In general, you don’t want to over-do it on bedroom decor, since this is the last place where you’d want to accumulate clutter. Greenery is the perfect pop of color a neutral bedroom needs (Camille’s bedroom, again, is a great example) and plants work well with color too. You can add a large plant like a rubber tree to a sunny corner, or stick with tabletop plants for your dresser or nightstand.
Keep It Minimal
The bedroom is where you rest and recharge. Entering a room with clutter or an abundance of decor may not help you relax at the end of the day. Especially if your bedroom is on the smaller side, be intentional with your extras. Let a refresh be an opportunity to go through your items and only keep what you need and love.
Opt for minimalism in your furniture and storage choices as well. Floating shelves can replace bulky nightstands for a more streamlined look, and keeping bins under your bed can provide much needed hidden storage. Instead of sparse and boring, rethink “minimal decor” as meaning intentional and streamlined.
Add Color
While neutrals create calm, the same can go for color—just the right ones. To infuse some color, consider switching up your bedding. Sage green, soft blues, and blush pinks are great for spring, whether you add a new duvet cover, sheets, or maybe just a throw or decorative pillow. Paint is another way to add a burst of color if you’re ready for a major change.
Go Monochromatic
Color drenching is a recent design trend that is sticking around, and a color-drenched bedroom can make you feel like you’re enveloped in a specific shade. Color drenching involves embracing one color and painting the walls, trim, and ceiling. Decor can be in various shades of the same color (or complimentary colors to the walls), and entering a color-drenched room should feel like stepping into a jewel box.
Darker colors work well in a color-drenched bedroom, as it creates a cocooning effect. You can also color drench in a lighter color to keep the space vibrant and bright, depending on the vibe you’re going for. Radhi Devlukia-Shetty’s bedroom, shown here, is wrapped in a warm rust color—a fantastic earth tone for a calm and serene bedroom.
Play With Pattern
Pattern comes in many forms, and adding some to your space will certainly liven it up. Start with what you like—are you drawn to floral patterns? Stripes? Toile? Add touches of pattern you love like bedding, pillows, or rugs to infuse more joy into your bedroom. And even if you’re not naturally drawn to bold patterns, subtle patterns can add much-needed texture to your space.
Bedroom decor ideas also include what’s on your walls. Wallpaper with a subtle pattern will add dimension, and can even come in handy if you’re color drenching. Instead of a matte paint color, wallpaper can work just as well, if not better, than a single paint color.
Introduce Fragrance
The right scent can transform the ambiance of your space. Adding a soft, relaxing fragrance through pillow sprays, essential oil diffusers, or candles will take the energy of your bedroom to the next level. Candles and oil diffusers also act as bedroom decor, which is a plus. Opt for scents that are meant to calm you, like lavender or sandalwood. Pillow sprays can help lull you to sleep, aiding in a cozy evening ritual that will set you up for a good night’s rest.
Refreshing your bedroom can mean a full makeover, or small, thoughtful changes that mindfully shift the feel of your space. Spring is the perfect time to dust off the old and welcome in what’s new. Focus on comfort, personalization, and simplicity to create a bedroom that feels like a true haven. Sweet dreams!
I once listened to an interview with a fashion entrepreneur, in which she shared that her early closet was a chaotic mix of fast fashion and impulse buys—she even joked it looked like someone had “thrown up” in it. Everything changed when she asked, “Who do I want to show up as in the world?” That question shaped her timeless, sophisticated personal style.
I love this idea of curating our wardrobes with intention. Each year, I reflect on my goals—so why not do the same for my style? Embracing a capsule wardrobe feels like the perfect way to align my look with who I’m becoming. The right outfit can make me feel confident, calm, or bold, depending on the occasion. As the season shifts, I’m considering how my wardrobe evolves right along with me.
Create a Personal Style Vision Board
These are a few prompts that help guide my style evolution:
Which looks feel most like me right now?
What pieces do I reach for over and over?
How do I want to refine my wardrobe this year?
To answer these, I spent an evening curled up on the couch creating my style mood board for the year (pictured above.) I started by searching Pinterest for looks that resonated with me and pinned them to my 2025 Personal Style board. Then I organized my favorites in Canva to create a cohesive vision for the year. The goal? To uncover patterns and themes in what I’m gravitating towards. This year, that means a color palette anchored in camel, cream, navy, and black, plus boxy tees, oversized button-downs, tailored trousers, and classic sweaters.
After curating my visual inspiration, I identify a few words that capture the essence of my style. These act as my north star when I’m building outfits. For 2025, my words are: refined, effortless, sporty. Every time I consider a new purchase, I’ll hold it up against these words to stay true to my vision (and avoid impulse buys that don’t align).
Shop Your Closet First
The next step? Shopping my own closet. I believe in slowly building a wardrobe over time that can evolve along with me, rather than starting from scratch each season. By identifying what I already own that reflects my vision, I can bring my mood board to life without feeling the need to constantly buy more. And when I do add something new, it’s with purpose.
My 35 Wardrobe Essentials
To illustrate the process (and provide some inspo if you’re into my style direction), here are the essential items I build my wardrobe around. Think of it as a capsule wardrobe of timeless, versatile staples—pieces that feel most me and save me from those “I have nothing to wear” moments.
Keep reading for:
A button-down I own in multiple colors
The most flattering jeans on the planet
My desert-island sneakers
My first-ever “investment piece” that I still love
What I wear to work out in almost daily
PANTS
Madewell Superwide-Leg Jeans: These were the jeans that converted me to wide-legs. They’re super comfy but also really long, so I can wear them out to dinner with a stacked boot and blazer.
RE/DONE 90s High Rise Loose Jeans: Vintage-inspired with a modern fit, these jeans are effortlessly cool and endlessly versatile. I wear them most often with a sneaker and sweatshirt.
Khaite Danielle Jean: As discussed here, these are an investment piece and by far the most expensive jeans I’ve ever purchased. That said, the incredibly flattering high-rise and structured denim make these luxurious enough to be worth it.
Aritzia The Effortless Pant: I have these in three colors, and they’ve become what I reach for when I need to look put together with minimal effort.
Spanx Ponte Flare Pant: I bought these very randomly and they ended up being the most flattering pants I own. They’re really supportive and make your legs look a mile long, which is why they’ve become my go-to date night look.
SHORT-SLEEVE TOPS
LONG-SLEEVE TOPS
Sezane Max Shirt: This is my official uniform. The crisp white button-down was my gateway drug that soon led to the blue ecru striped… and then the denim. Which do I need next?
Haven Well Within Shaker Stitch Cardigan: Cozy, textured, and made for weekend lounging or WFH days.
Sezane Trudy Jumper: I love a striped sweater, and this is a classic version with total French girl vibes.
OUTERWEAR
Cuyana Wool Cashmere Sweater Coat: A wool coat is the best investment piece, and this one is luxuriously soft for a sophisticated layer. I just took it to Paris and it worked for every occasion.
Sezane Christie Jacket: A structured, soft blazer that instantly elevates a white t-shirt. I ordered a size up for a boxy oversized fit.
Aritzia The Super Puff Shorty: If you’re thinking of splurging on a Canada Goose puffer, stop and get this $235 version instead. Everything from the length to the material is absolute perfection.
Sezane Scott Trench Coat: I’ve worn this timeless trench for years—it’s the quickest way to pull together any outfit, from dresses to sweats.
ACTIVEWEAR
Alo 7/8 High-Waist Airlift Legging: Sculpting and so supportive, these leggings move seamlessly from workout to errands.
Form Scoop Bra: This is my go-to sports bra with the perfect mix of support and comfort. I have it in 3 colors and wear it daily for morning workouts. I love Form’s leggings, too.
Varley Catherine Half-Zip: I always go for the preppy vibes of a half-zip pullover, and this one is butter-soft and the perfect length.
Daily Drills Unisex Oversized Crew: The coziest sweats hands-down; this is my uniform for lounging and weekend errands. There’s something about the cut and material that never looks sloppy, despite the oversized fit.
SHOES
Common Projects Original Achilles Low Sneaker: I love these sneakers so much, I’m on my third pair (and they were the #1 shopped item from this newsletter last year!). They’re the perfect minimalist sneaker that makes any outfit look sporty-chic.
Adidas OG Sambas: I wore these all over Paris last month, and the black stripe added just the right amount of vintage sport to every outfit. Most importantly, they’re insanely comfortable.
Madewell The Ardin Ankle Boot: These are sleek, with a not-too-high heel so I can actually walk around them all day pain-free.
Sezane Fausta Clogs: I’m not really a heels girl, so when the occasion calls for it, this platform clog feels elevated without trying too hard.
New Balance 327 Sneakers: My go-to workout sneaker, these are basically perfect. I love the platform sole that adds support and makes my legs look a few inches longer.
ACCESSORIES
Los Angeles Baseball Cap: This cap is the perfect shape for my head, and I throw it on whenever I need to get out the door fast. I love the sporty touch it adds to a white button-down and jeans.
Celine Cat Eye Sunglasses: When it comes to splurges I’m all about cost-per-wear, and what gets more wear than our sunglasses? These are the class, oversized shape I love.
Quince Barcelona Sunglasses: That said, if you tend to lose your sunnies as frequently as I do, these are an amazingly affordable alternative that looks and feels luxurious.
Sezane Romie Hoops: These sculptural hoops add a minimalist touch to both casual and elevated outfits. I wear mine literally every day.
Sezane Taylor Belt: I have this truly classic, high-quality belt in both black and brown. It’s an easy way to add structure and polish to jeans, trousers, and even linen shorts.
BAGS
Celine Luggage Tote: This was my first (and one of my only) true investment pieces, and it’s probably my most treasured wardrobe possession. I love it as much now as I did when I got it a decade ago—it’s truly stood the test of time! I’m linking to some well-priced used Celines which is both smart and sustainable.
Sezane Farrow Raphia Bucket Bag: Every wardrobe needs a classic “basket” bag for warm-weather months. I have a few because I’m obsessed, but this is my favorite.
Clare V Midi Sac: This chic crossbody is compact and incredibly versatile. It’s surprising how much it holds considering its size. I have it in both tan and forest green, and wear it constantly.
I’m a sucker for good advertising. I am exactly the kind of person telemarketers dream of when they throw in a few cheesy before-and-after photos to their commercials. Case in point? This depuffing chin strap for double chins. While I wouldn’t say I have a super saggy chin, I also don’t consider my jawline to be anything to write home about.
So, when I saw Kathleen Jennings Beauty raving about this wonder-mask on Instagram, I immediately added it to my cart. But does it really work? Can wearing a mask for an hour really get rid of that pesky double chin? I decided to test it out for myself. To get a comprehensive breakdown of the product, I asked two experts to share the science behind the depuffing chin strap. Read on to see my own cheesy before-and-after photos and find out if this mask truly is a miracle or a myth.
Featured image by Hannah Haston.
The Experts:
What is the depuffing chin strap, and what is it supposed to do?
The depuffing chin strap that I tested is called the V-Line Lifting Hydrogel Collagen Mask by Stylia, and it can be found on Amazon. (You may have also heard of the Chinology mask review popular on TikTok.) It aims to “tighten and define your jawline,” and “eliminate double chin and saggy skin.” Sounds pretty good, right?
Plus, the product itself is foolproof. All you do is peel off the protective lining, stretch the mask lightly a few times, and hook it around your ears. The instructions say to wear the mask for 30 minutes, but there is a note that says the mask should be worn for an hour for the first week and *spoiler alert* the longer you wear it, the better. The star ingredients are hyaluronic acid, hydrolyzed collagen, and aloe vera extract, which all have smoothing and tightening properties.
What ingredients or aspects of this mask make it effective?
Dr. Desai notes that these masks tend to be infused with collagen, vitamin C, caffeine, and/or niacinamide. These ingredients can give your skin a hydrated, tighter feel, but that tends to last only about a day. Over time, if used consistently every day, you can gradually improve skin quality. But don’t expect to see the same tightening effects you would from surgery or an in-office laser treatment.
According to Tavernise, chin straps also work on the simple premise of temporarily defying gravity. “During our day-to-day life, there are many environmental factors that impact our skin and contribute to aging. A chin strap holds the skin in place and for that time, it is protected and supported,” Tavernise shares. However, she also commented that unless you are wearing the strap 24 hours a day (which is still a stretch), it is not going to provide lasting results.
How can we reap all of the benefits of this depuffing chin strap?
Tavernise advises that chin straps are best used when paired with facial exercises and/or gua sha. “There are known benefits shown by working out the muscles of the face and a chin strap could amplify the effects,” says Tavernise. She also notes that consistency is always key, so it’s important to commit to doing these facial exercises daily. Even without the mask, it’s a great budget-friendly way to tone and sculpt the facial muscles and provide a lift. Dr. Desai emphasizes that bringing your skincare routine down to your neck, and being diligent about your sun protection can yield even better results.
So, can you really shape a jawline and fix a sagging chin with a mask?
Tavernise sums it up best: “A chin strap is like a bra for your face.” She shares that there are no clinical studies to show that they offer any real results, but they do provide a temporary lift. Even when worn over time, a chin strap will not change the structure or shape of your face. Dr. Desai agrees that after you use a chin mask, you may notice that your skin feels smoother and tighter, however these results are unfortunately temporary.
The common consensus between a dermatologist and an esthetician? For the most part, this depuffing chin strap is a myth. The silver lining is that there is some science behind the slight benefits, and I definitely saw some slight results.
My Experience Using the Depuffing Chin Strap
Since I am a perfectionist and an overachiever, I wore this mask for an hour every day for two weeks, despite that being longer than the package’s instructions. I strapped it on for an after-dinner movie, my morning coffee, during my lunch break, and even on an airplane (yes, I got some very confused looks). I also used two fingers to massage my jawline while wearing the mask to hopefully emphasize the results.
The biggest lesson I learned from all of this is that committing to wearing something every day is harder than you’d think! It’s by no means painful, but I also didn’t find it to be very comfortable. It starts to pull on your ears after a while, giving me a similar feeling to wearing a headband for too long. I also wished that the mask was reusable, since it felt like a waste to open up a new package every day and throw it out after an hour. But, there’s no clean-up involved, which made the mask easy to throw on whenever and wherever I could.
The following before-and-after series were taken after wearing the mask for an hour and if you look closely, you can see that my chin and jaw were slightly more defined after using the depuffing chin strap. However, you’ll also notice that all of the before photos look pretty similar, and I was disappointed that there were no lasting results.
All in all, there was no big difference from day one to day 14. The only times I noticed a difference was right after I took the mask off, and just like both Dr. Desai and Tavernise said, the results were only temporary. And, because of my schedule, it was easiest for me to wear the mask at night, so no one even got to witness my temporarily snatched jawline.
So, the depuffing chin strap has been debunked and unfortunately, there are no shortcuts to ditching a sagging chin. If you really want to see long-term improvement, Tavernise recommends dedicating a few minutes a day to facial massages and gua sha, which is both cheaper and easier to commit to. However, if you are experiencing any sort of swelling or have an event later that day, these masks will still provide a temporary fix.
This post was last updated on March 31, 2025 to include new insights.
The Gin Rickey is a classic cocktail first mixed in Washington, D.C. This mixed drink is made by combining gin, lime juice and club soda. If you’re a gin lover who prefers simple cocktails, this might be the perfect recipe for you. This drink is famous for its mention in The Great Gatsby, but it’s easier to mix up than you would probably guess.
More mixed drinks: Gin and Tonic, Dirty Shirley, Vodka Tonic, Ranch Water, Spaghett.
Ingredients
Gin – Choose your favorite quality gin, such as Hendrick’s gin.
Lime Juice – Freshly squeezed is essential for this recipe.
Club Soda – Or any unflavored sparkling water.
The best type of glassware to serve a Gin Rickey in is a highball glass. Garnish with lime wedges or slices of lime.
History
The Gin Rickey was created by Democratic lobbyist Joe Rickey, who lived in Washington, D.C. Rickey asked the bartender to created a sugar-free drink for him using bourbon, soda water and lime. This is the Bourbon Rickey and the Gin Rickey was invented shortly after and has been a popular gin drink ever since.
Instructions
Begin by filling a highball glass with ice. Next, pour gin and lime juice over the ice.
Top with club soda.
Garnish with lime slices or a twist of lime.
Tips for Making
Flavor Ideas – For flavored variations, you can use a flavored seltzer water or add an ounce of syrup (such as grenadine or mint simple syrup).
Garnish Ideas – Try adding fresh mint, a maraschino cherry or more lime slices throughout the drink for added garnish. You may also use other herbs such as rosemary or lavender to garnish this drink.
More Gin Cocktails to Try
Frequently Asked Questions
What is in a Gin Rickey?
A Gin Rickey cocktail is made using just three ingredients: gin, lime juice and club soda.
What is the difference between a Gin Rickey and a Tom Collins?
A Gin Rickey and Tom Collins are similar with the main difference being the Tom Collins includes simple syrup where the Gin Rickey does not contain added sugar. The Tom Collins uses lemons while the Gin Rickey recipe prefers limes.
What is the difference between a Gin Rickey and a Gin and Tonic?
The only difference between these two drinks is the mixer. The Gin Rickey calls for club soda while the Gin and Tonic calls for tonic water.
Get our FREE recipe guide with our most popular recipes of all time!
Get the Guide
Free Popular Recipe Guide
Our top 25 recipes of all time!
Print
Get the Recipe
Learn to make the Gin Rickey which is made by combining gin, lime juice and club soda. Famous from The Great Gatsby.
Instructions
Begin by filling a highball glass with ice. Next, pour gin and lime juice over the ice.
Top with club soda.
Garnish with lime slices or a twist of lime.
Notes
Flavor Ideas – For flavored variations, you can use a flavored seltzer water or add an ounce of syrup (such as grenadine or mint simple syrup).
Garnish Ideas – Try adding fresh mint, a maraschino cherry or more lime slices throughout the drink for added garnish. You may also use other herbs such as rosemary or lavender to garnish this drink.
Nutrition
Nutrition Facts
Gin Rickey
Amount per Serving
% Daily Value*
* Percent Daily Values are based on a 2000 calorie diet.
Notice: Nutrition is auto-calculated, using Spoonacular, for your convenience. Where relevant, we recommend using your own nutrition calculations.
How many times have I poured over a cookbook, flagged multiple favorites, only to return it to a shelf, waiting for the perfect occasion to arise? And then maybe I’ll flip back through my earmarks, only to lament the lack of ingredients on hand, or the kitchen tools needed, or, more crucially, a hungry table to cook for. There are only so many ways to pitch a dish like “pan-roasted romanesco with golden raisins, tahini, and sumac” to my two young children, whose palettes favor all things brown and beige despite my best efforts. Alas, it’s time to stop waiting for the occasion—my cookbook club awaits.
A cookbook club is a gathering of friends where everyone cooks a dish from the same cookbook, then meets to dish and dine. It blends the concept of a book club with a communal dining experience. The result is that everyone can try new cuisines or improve their cooking skills and enjoy meaningful conversations over a shared meal.
Why start a cookbook dinner club?
The greatest gathering joys happen around a table with great food and great conversation. If there’s one thing I’ve learned from attending multiple gatherings hosted by Camille, it’s to always have a conversation starter or two in your back pocket. The table could be set to perfection, the food utterly delicious, the playlist vibing, but at the point of sounding saccharine, it’s the laughs, tears, and meaningful conversations that matter post. Done well, a great gathering is just a vehicle for connection. And hosting a cookbook dinner club is a beautiful opportunity for food and conversation—plus, it’s a low-key way to connect with friends without the pressure of hosting a full-on dinner party.
How to Organize Your Cookbook Dinner Club
1. Determine the logistics.
Choose Your People: I’d advise kicking off with a small group of people who can commit and set the foundation of your club. Start with four members at the least and eight at most. The size of your group might also depend on your space and the format. Invite people who are adventurous, interesting, and feel like they’d get along well together.
Note Allergies or Sensitivities: In an email thread, text thread, or shared doc for easy reference, ask each member to share their allergies or food sensitivities so they can be considered when selecting menus.
Set Expectations: Will your group focus more on causal fun or a culinary challenge? Will you cook through an entire book or mix it up every time you meet? Will you cook together or bring prepared dishes? There are multiple ways you can set up your cookbook club, just make sure everyone is on the same page (pun intended).
Get it on the Calendar: A plan isn’t real until it’s on the calendar. Determine your hosting schedule (typically monthly or bi-monthly), whether there will be rotating hosts or one consistent location, and finally, the first meeting date.
2. Select the cookbook and plan the menu.
How to choose the cookbook: If you rotate hosts, a simple way to choose the cookbook is to let the host decide. In my opinion, the best cookbook for your dinner party comes down to one simple requirement: Everyone is excited to cook from it.
Ask guests to throw out their tried-and-true alongside new, exciting cookbooks. You could choose a seasonal cookbook like Six Seasons by Joshua McFadden and Martha Holmberg or a classic a là Julia Child. Maybe you’re group is interested in trying a specific cuisine, or they are more interested in baking than sautéing. In which case, a brunch-based cookbook club with breads and pastries from a French pastry chef could be right up your alley. Or, try a dessert night because we’re adults and we can eat dessert for dinner if we want to.
A few favorites for any kind of cookbook club are Gjelina by Travis Lett for vibrant, seasonal recipes that never fail to delight, Bavel by Ori Menashe, Genevieve Gergis, and Lesley Suter for a Mediterranean night, Nothing Fancy by Alison Roman because everything she touches is golden (and delicious). Sweet Tooth by Sarah Fennel is perfection for a dessert night, as is Dessert Person by Claire Saffitz. You can always peruse this list of Camille’s favorite cookbooks to spark more ideas.
Plan the menu: To keep it simple, consider two ways to determine the menu. In scenario one, the host decides. She would select the recipes and then either assign them to members or send them out for members to choose first-come, first-served. You could do this via a shared Google doc or in an email thread. In scenario two, members are free to choose their own dish from the cookbook. Just make sure everyone shares ahead of time so there aren’t multiples, and so the meal is balanced from start to finish.
Tip: The host should offer to cook the dish that requires the heaviest lifting, often the main course.
Hosting Tips for a Seamless Gathering
1. Set the table and the atmosphere.
Set the Scene: Make the table effortless and inviting with a few candles and a vase full of fresh flowers, greenery, or herbs. Put on a playlist (extra points if it matches the cookbook’s theme) and be ready to offer guests a drink when they arrive
If hosting is new to you (or if you just need a refresher), here’s a guide to hosting your first dinner party.
Encourage Conversation: This is where those conversation starters come in handy. Tip: Ask ChatGPT to generate a few icebreaker questions specific to your cookbook. Jot them down on a notecard and place them on the table or under plates.
2. Clean up and plan your next gathering.
Make clean-up part of the party: Keep things easy by cleaning up together. Even though you’re hosting, everyone played a part in creating the meal, and dish duty is part of the experience! Don’t be afraid to assign roles, turn up the playlist, and make it all part of the party. Tip: Keep containers on hand for leftovers (or ask guests to bring their own).
Plan for next time: Avoid the group text back and forth and make plans for the next one before everyone leaves. Decide who’s hosting, chat about themes, land on a date, and get it scheduled! It’s a simple send-off, but one that will help you stay consistent and accountable.
Why You’ll Love It
A cookbook dinner club is more than just a meal—it’s a way to slow down, savor good food, and deepen connections with friends. Whether you’re discovering new ingredients, mastering a new technique, or simply enjoying the act of gathering, each dinner becomes a celebration of community and creativity. With the right group, a thoughtful menu, and a little planning, your cookbook club can become a beloved ritual—one that brings inspiration to both your kitchen and your table. So choose your first cookbook, set a date, and get ready to make delicious memories.